1. Introduction to Linux
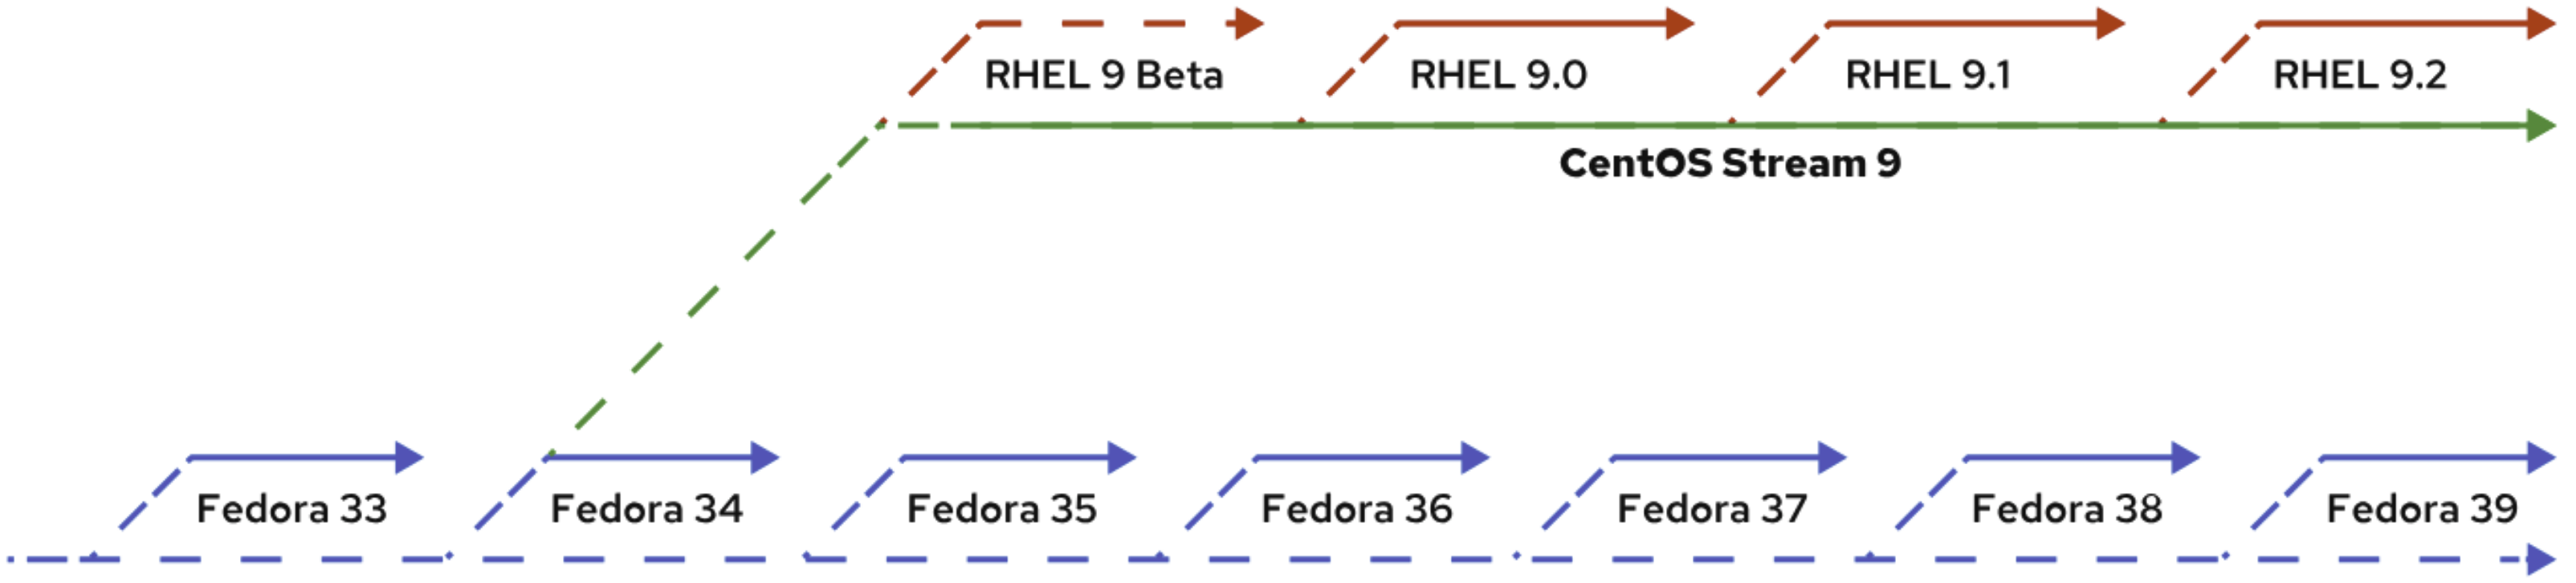
Open Source refers to software whose source code is freely available to the public for anyone to view, modify, and distribute. It encourages coolaboration, transparency, and community-driven improvements. Open Source Licenses are legal agreements that define how software can be used, modified, and distributed. There are two main types of Copyleft and Permissive. The differences between Fedora, CentOS Stream, and Red Hat Enterprise Linux (RHEL) are primarily based on their release cycles, stability, and target audiences. Fedora is a cutting-edge distribution that always features the latest software and technologies, making it ideal for developers and enthusiasts who want to experience the newest features. CentOS Stream serves as a rolling preview of future RHEL versions, acting as a middle ground between Fedora and RHEL. Finally, RHEL is the most stable and secure option, designed for enterprise environments that require long-term support and paid services. RHEL is commonly used in production systems that demand reliability and robust commercial support. SHOW CONTENTS
2. Manage Files From the Command Line
Linux File System Hierarchy
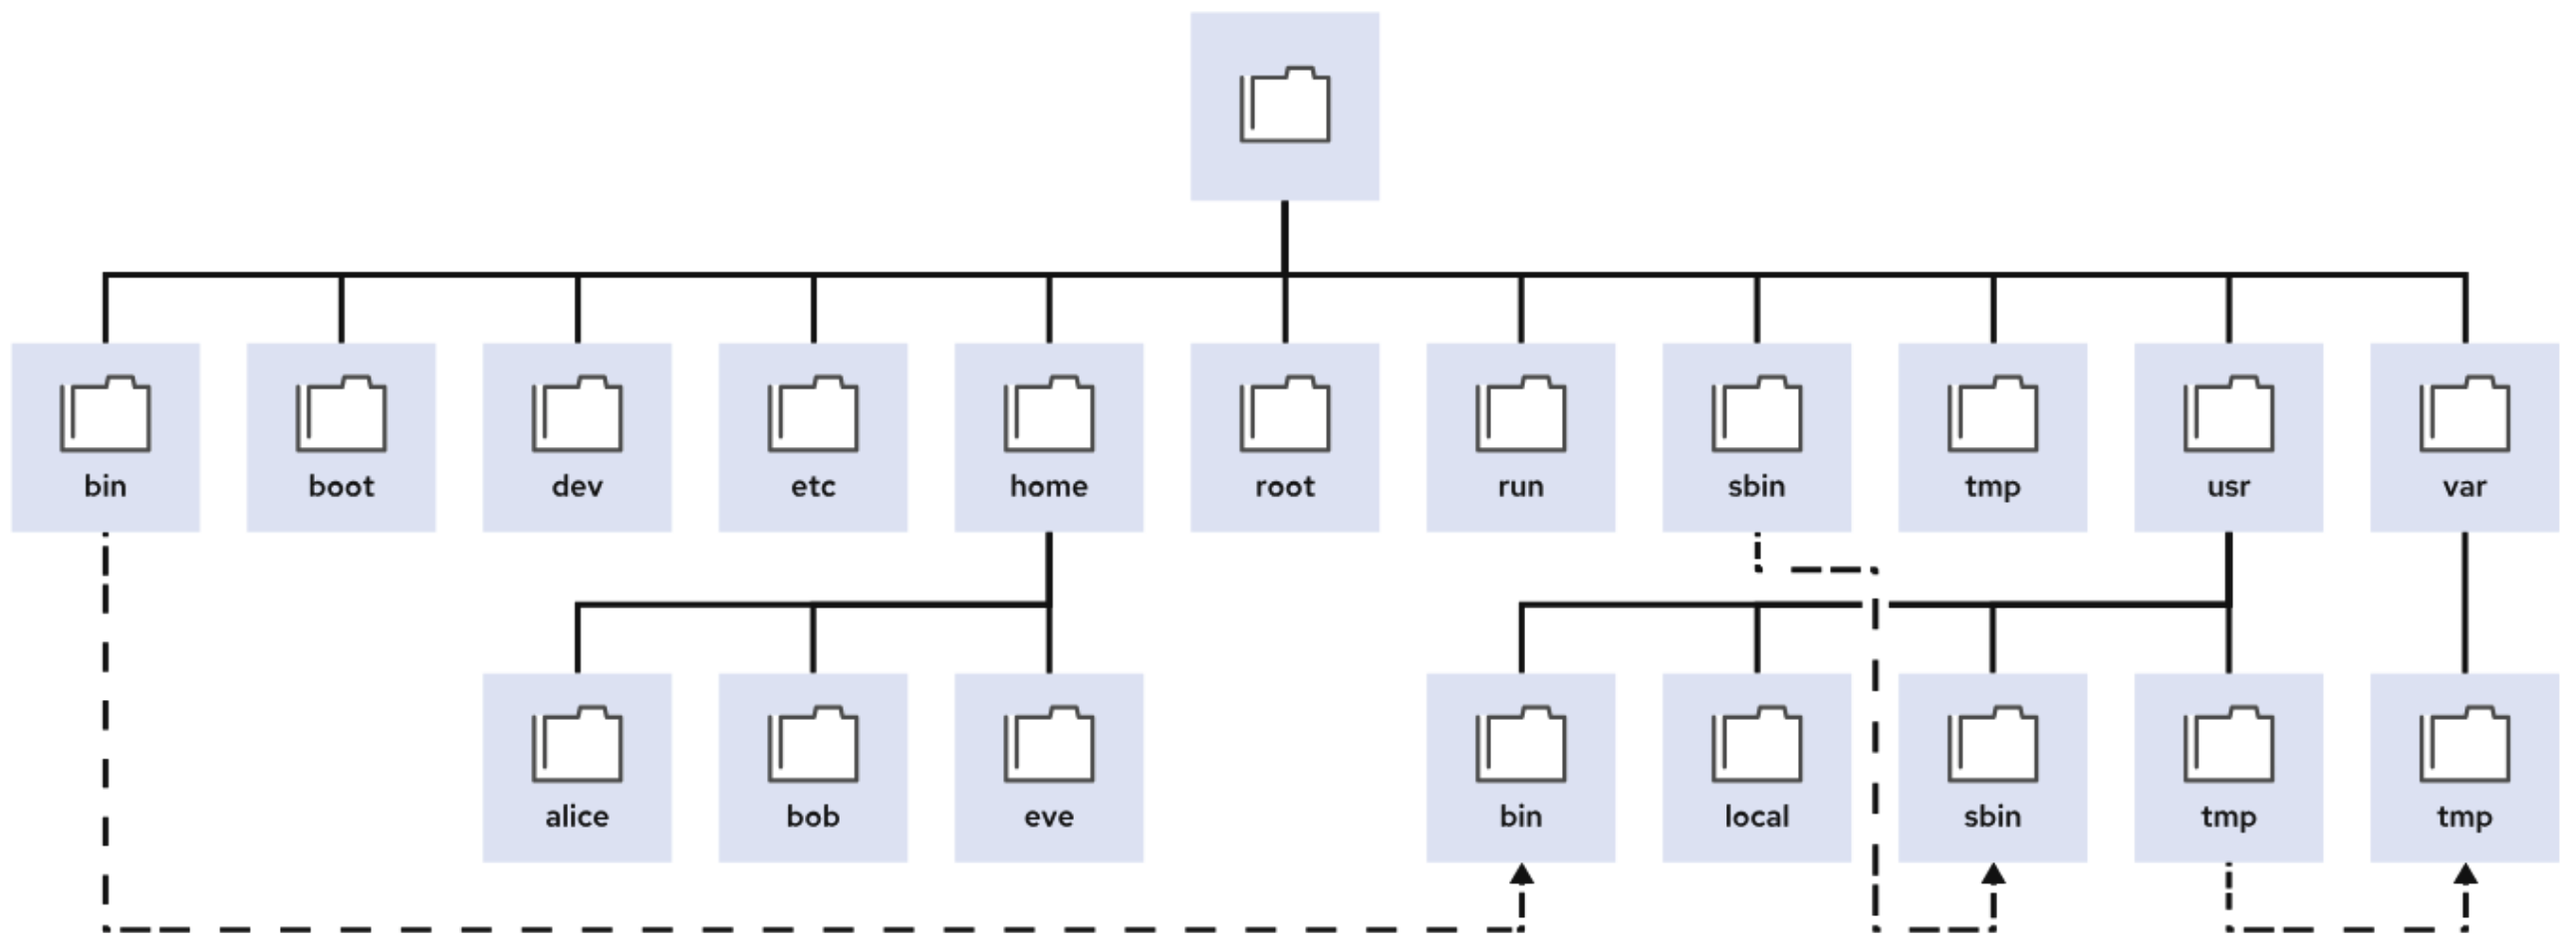
The Linux File System Hierarchy defines the directory structure and directory contents in Linux-based operating systems. It stores all files which organized into a single incerted tree structure. Here’s an overview of the key directories in the Linux file system hierarchy: static, dynamic(variable), persistent, runtime: Static content remains unchanged until explicitly edited or reconfigured; Dynamic (Variable) content might be modified or appended by active processes; Persistent content remains after a reboot, such as configuration settings; Runtime content from a process or from the system is deleted on reboot.SHOW CONTENTS
Location
Purpose
/bootFiles to start the boot process.
/devSpecial device files that the system uses to access hardware.
/etcSystem-specific configuration files.
/homeHome directory, where regular users store their data and configuration files.
/rootHome directory for the administrative superuser, root.
/runRuntime data for processes that started since the last boot. This data includes process ID files and lock files. The contents of this directory are re-created on reboot. This directory consolidates the
/var/run and /var/lock directories from earlier versions of Red Hat Enterprise Linux.
/tmpA world-writable space for temporary files. Files that are not accessed, changed, or modified for 10 days are deleted from this directory automatically. The
/var/tmp directory is also a temporary directory, in which files that are not accessed, changed, or modified in more than 30 days are deleted automatically.
/usrInstalled software, shared libraries, including files, and read-only program data. Significant subdirectories include:
/usr/bin: User commands; /usr/sbin: System administration commands; /usr/local: Locally customized software
/varSystem-specific variable data that should persist between boots. Files that dynamically change, such as databases, cache directories, log files, printer-spooled documents, and website content, might be found under
/var.
Common Directory and File Management Commands
SHOW CONTENTS
pwd: Prints the current working directory (path) to the terminal.cd: Changes the current working directory to the home directory of the current user.cd -: Changes the directory to the previous directory.cd ../..: Moves up two levels in the directory structure.cd ..: Moves up one level in the directory structure (to the parent directory).ls -l: Lists files and directories in the current directory in long format, showing details such as permissions, owner, group, size, and last modification time.ls -al: Lists all files (including hidden files) in the current directory in long format.ls -lR: Lists files and directories recursively in the current directory and all its subdirectories, in long format.ls -l file*.txt: Lists files that start with the word file and end with .txt.cp hello.py HELLO.py: Copies the file hello.py to HELLO.py. The original file remains unchanged.mv -v hello.py HELLO.py: Moves (or renames) the file hello.py to HELLO.py. The -v option prints verbose output showing the operation.rm HELLO.py: Removes (deletes) the file HELLO.py. Be careful, as this is a permanent deletion.mkdir HOME: Creates a new directory named HOME in the current directory.rmdir HOME: Removes an empty directory named HOME. If the directory contains any files, it cannot be removed with rmdir.
Create Links Between Files
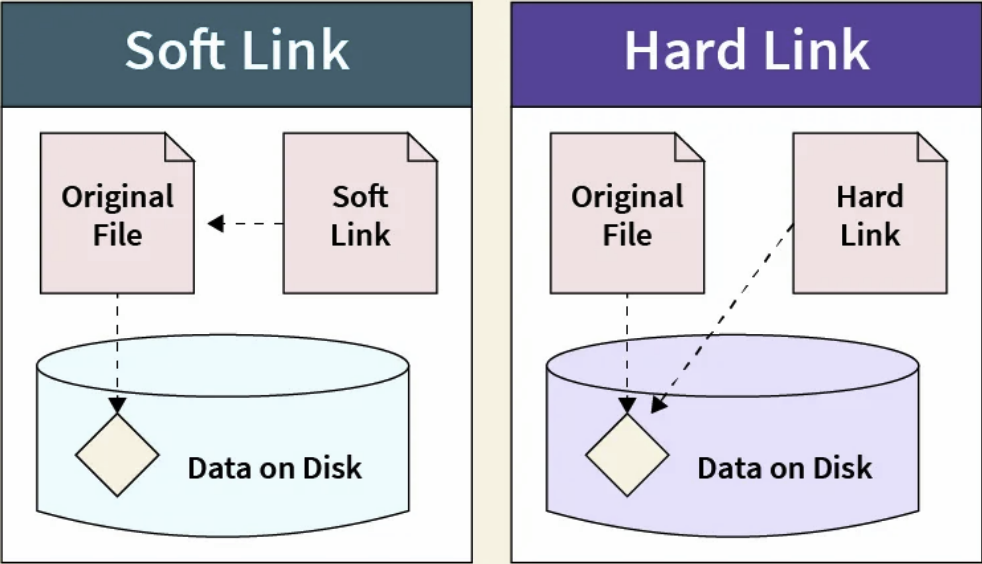
In Linux, there are two types of links that can be created for files: hard links and soft links. A hard link is a direct reference to the data of a file. It creates another name for an existing file, pointing directly to the file’s inode (the underlying data structure that holds the file’s metadata and data.) A soft link, on the other hand, is a reference to the original file’s path, rather than directly pointing to the file’s inode. Hard links that reference the same file share the same inode struct with the link count, access permissions, user and group ownership, time stamps, and file content. Therefore, when any of this information is changed for one hard link, the changes are reflected in all other hard links pointing to the same file. Commands for creating links between files are as follows:SHOW CONTENTS
ln file.txt file_link.txt # Create a hard link
ls -i file.txt file_link.txt # Show the inode number for both files
ln -s file.txt file_soft.txt # Create a soft link
ls -l file_soft.txt # Check if the soft link work (file_soft.txt -> file.txt)
3 Get Help Using man Command
The The most common way to use Note that before running SHOW CONTENTS
man command in Linux is used to display the manual pages for various commands, programs, system calls, etc. The man pages are divided into 9 sections: executable programs or shell commands, system calls, library calls, special files, file formats and conventions, games, miscellaneous, system administration commands, and kernel routines (non standard).
Executable programs or shell commands: Commands executed by regular users (e.g., ls, cp).System calls: Functions that the kernel provides for programs to interact with the system (e.g., open, read).Library calls: Functions that can be used in programs written in C and other languages (e.g., printf).Special files: Usually found in /dev(e.g., /dev/sda).File formats and conventions: Descriptions of file formats (e.g., /etc/passwd).Games: Information about games available on the system.Miscellaneous: including macro packages and conventions (e.g. man(7), groff(7)).System administration commands: Commands for system administrators (e.g., useradd, systemctl).Kernel routines: Non standard
man command including:
man open or man open.3: Displays the manual page for the open command. (open exists in Section 2 (System Calls) and Section 3 (Library Functions), man open display the System Call documentation while man open.3 display the Library Function manual.)man -f ls: Displays a brief description of the ls command, equivalent to whatis ls.man -k ls: Searches the manual page database for the term ls, equivalent to apropos ls.
man -f ls or man -k ls, it is important to ensure that the mandb database has been built. This can be done by running sudo mandb.
4. I/O Redirection & Pipelines
I/O Redirection
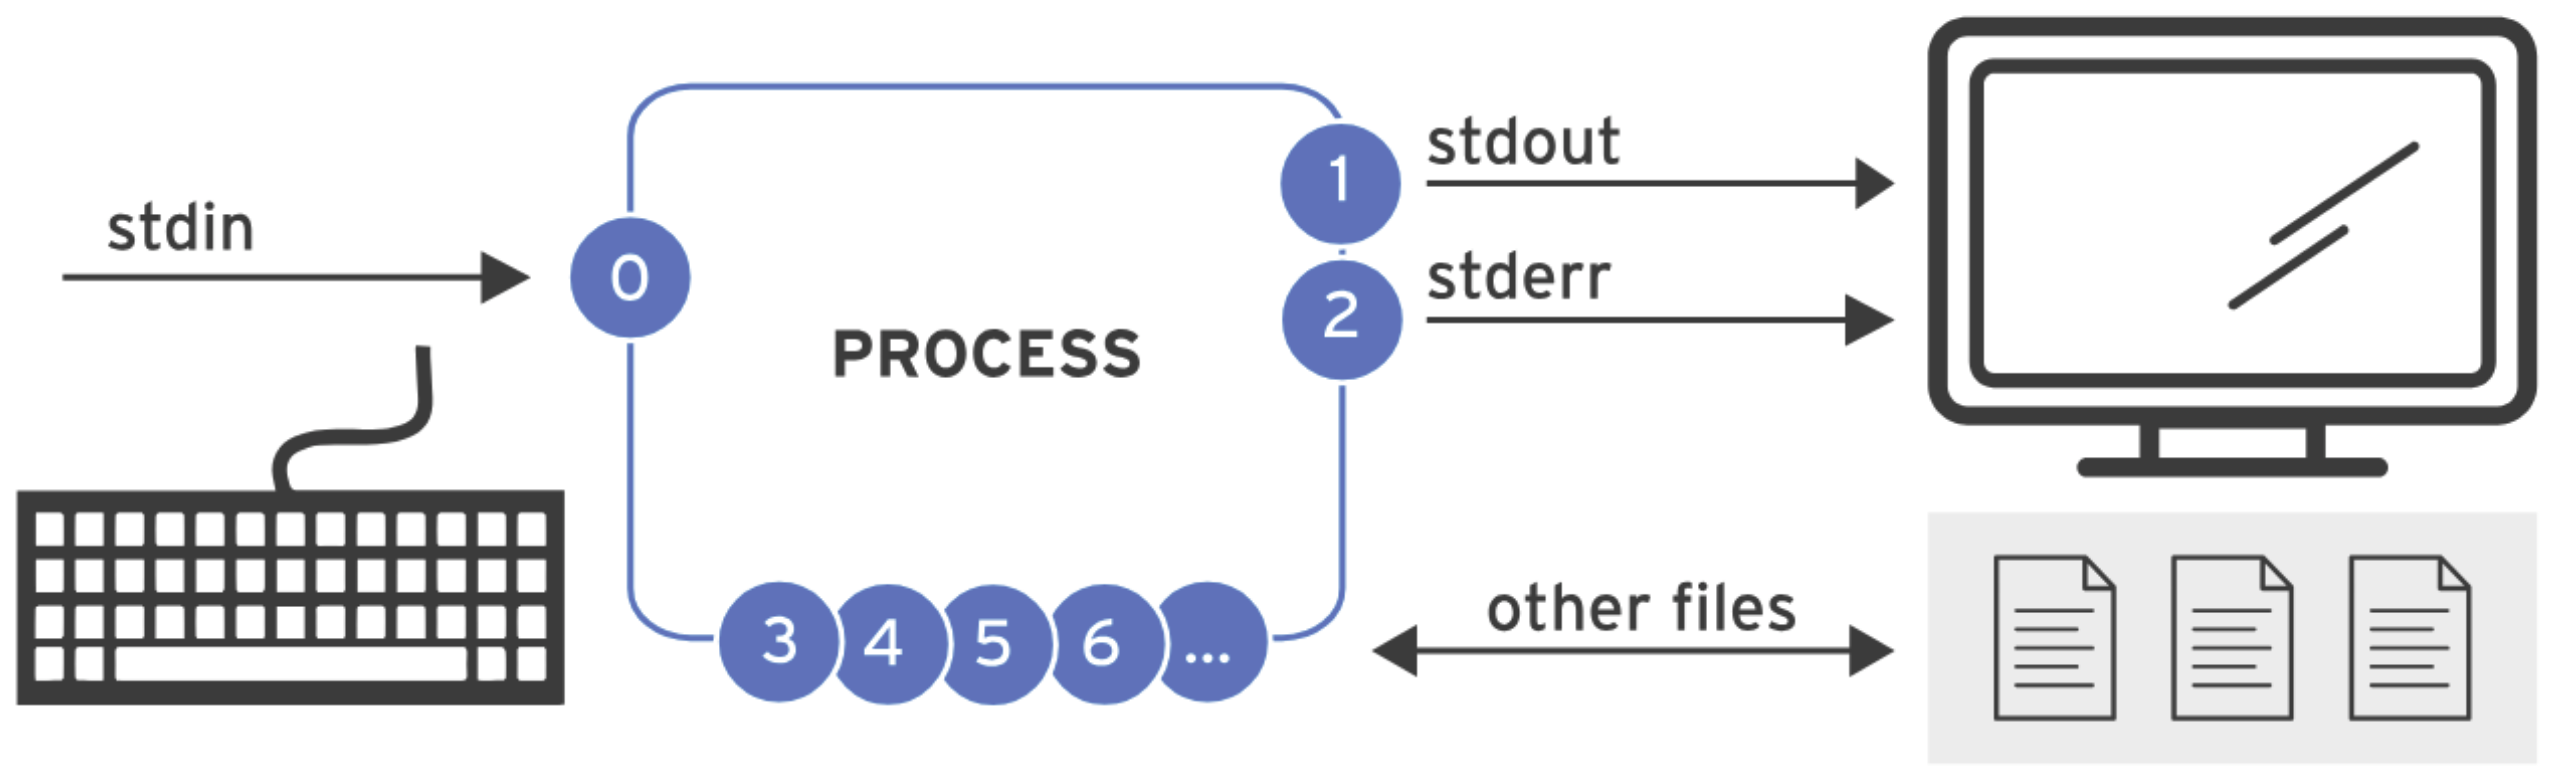
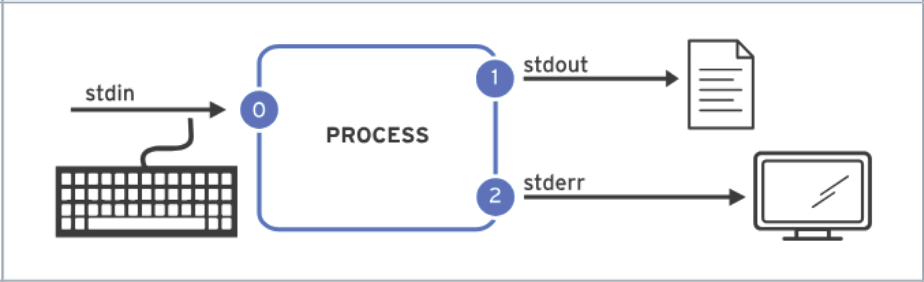
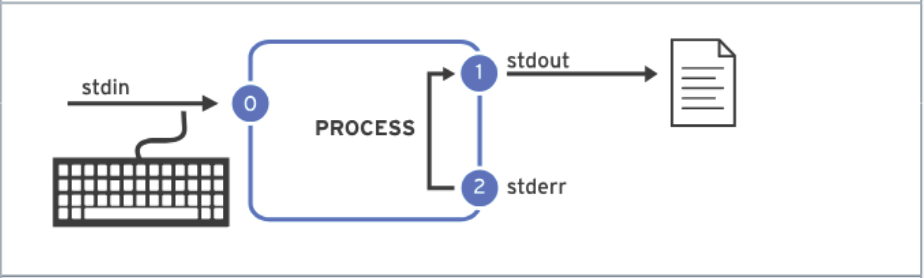
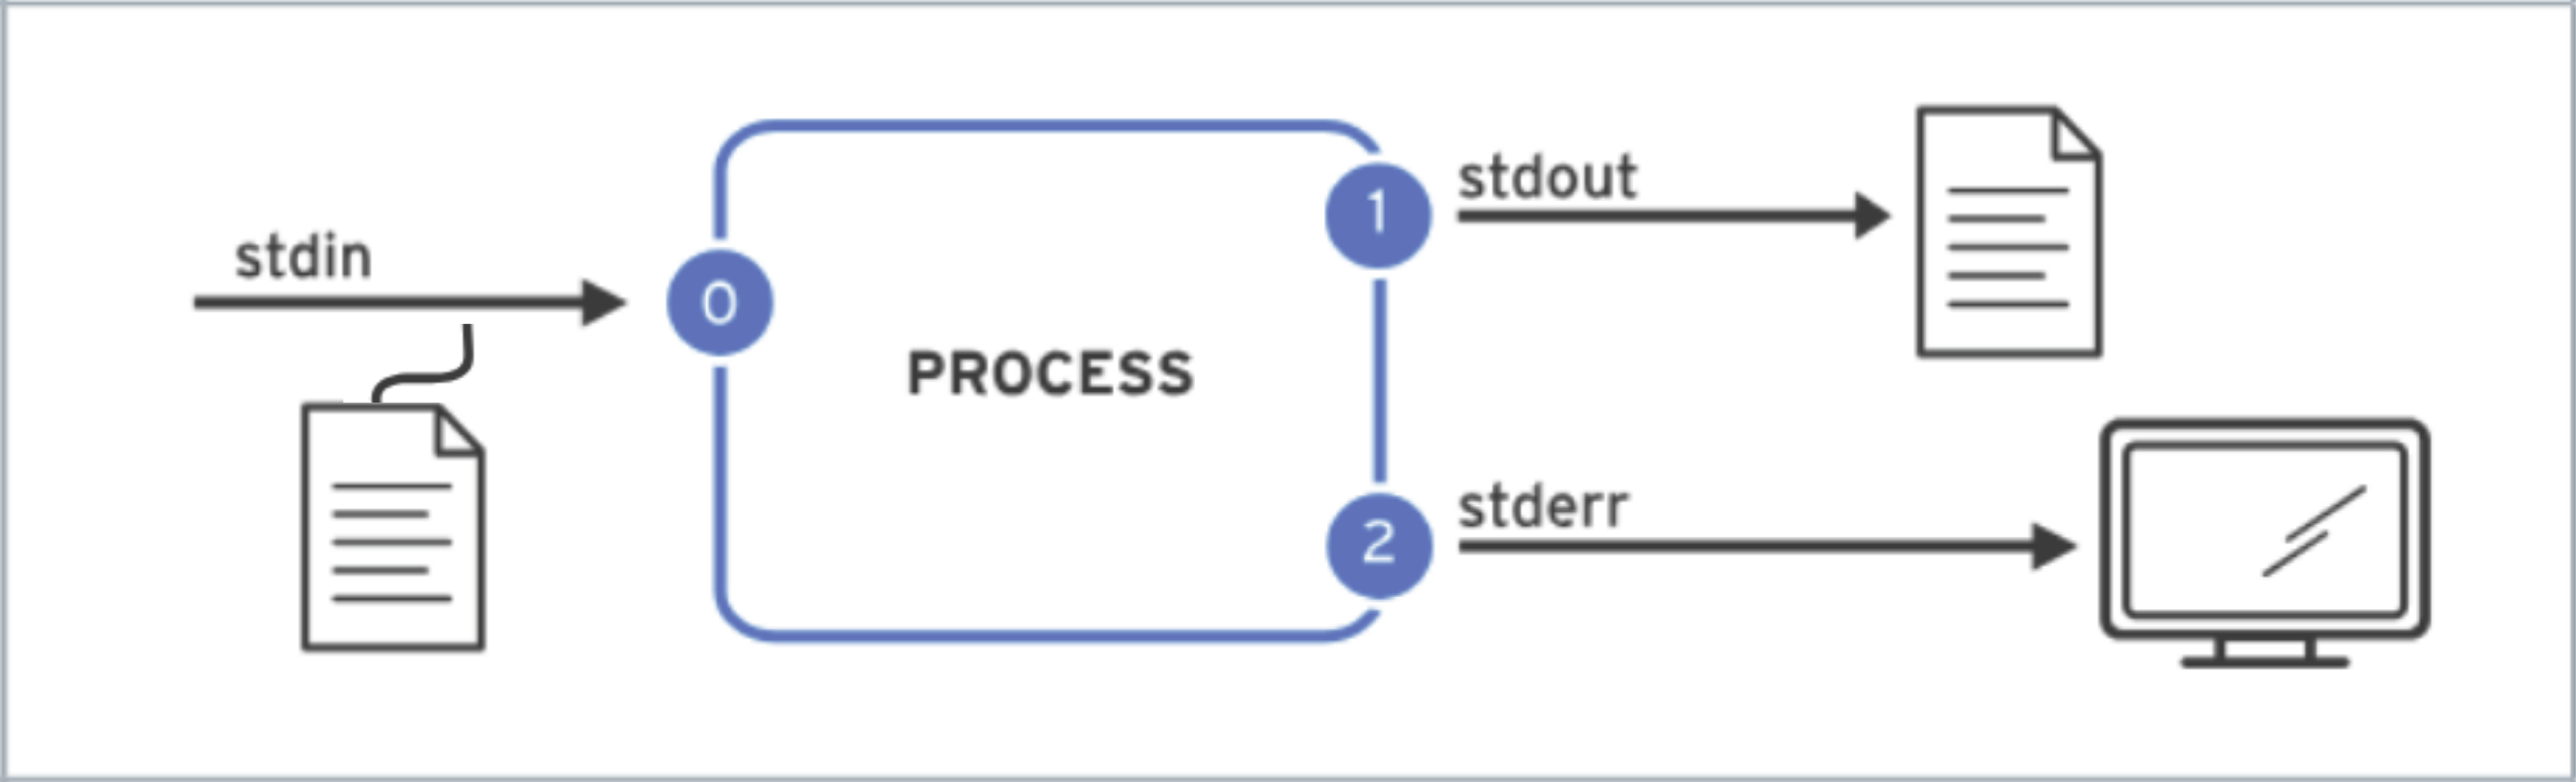
A process reads input and writes output. By default, it reads input from the keyboard and sends its output to the terminal window. Processes use numbered channels called file descriptors to manage input and output. Every process starts with at least three file descriptors: By default, a process takes input from the keyboard and displays its output on the terminal. Redirection refers to changing the default input or output of a command. The following table summarizes the different types of redirection available: It is important to note that the order of redirection operations is crucial. For example: Additionally, the command SHOW CONTENTS
Number
Channel Name
Description
Default Connection
Usage
0
stdin
Standard input
Keyboard
Read only
1
stdout
Standard output
Terminal
Write only
2
stderr
Standard error
Terminal
Write only
3+
filename
Other files
None
Read/write or both
Usage
Explanation
Vitulization
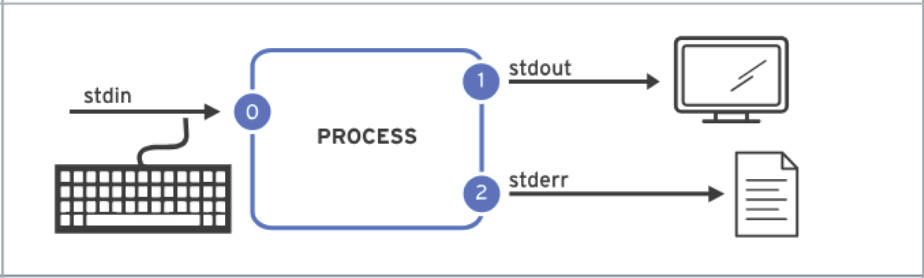
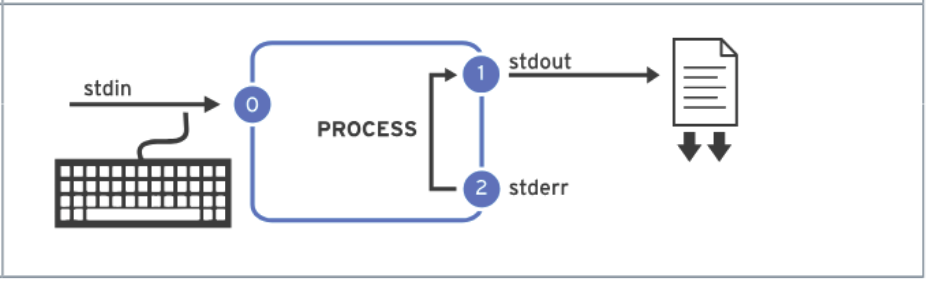
> fileRedirect stdout to overwrite a file
>> fileRedirect stdout ot append to a file
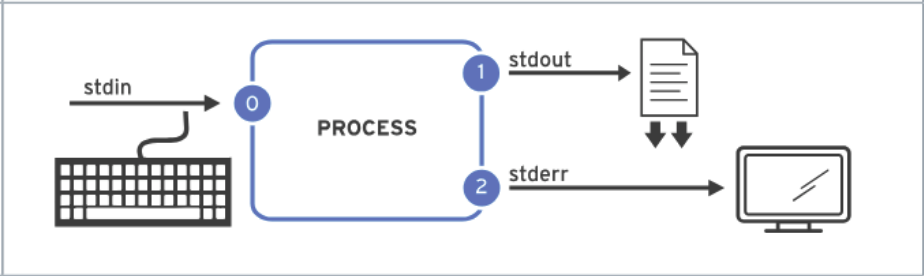
2> fileRedirect stderr to overwrite a file
2> /dev/nullDiscard stderr error messages by redirecting them to
/dev/null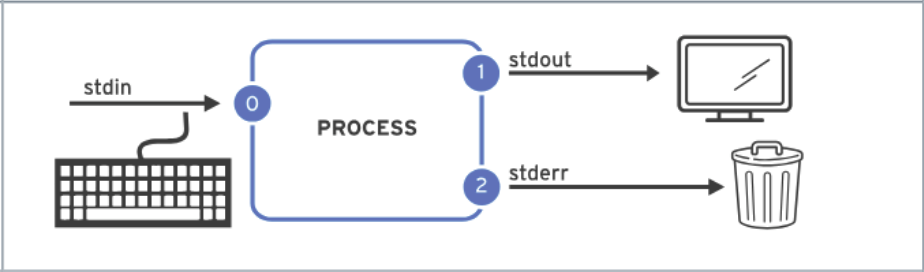
> file 2>&1 or &> fileRedirect stdout and stderr to overwrite the same file
>> file 2>&1 or &>> fileRedirect stdout and stderr to append the same file
sort < file > sorted_fileRedirects the stdin to a file and redirect stdout to overwrite a different file
> output.log 2>&1 redirects both standard output and standard error messages to the same file, output.log.2>&1 > output.log redirects standard error messages to the default standard output (the terminal), and then redirects only the standard output to output.log.
> output.log 2>&1 can be shortened to &> output.log. However, it is important to note that &> is not standardized and may not be implemented in all shells.
Pipelines
A pipeline is a sequence of one or more commands that are connected by the vertical bar character ( The main difference between pipelines and I/O redirection lies in how they handle data. I/O redirection refers to sending standard output to a file or receiving standard input from a file. In contrast, pipelines are used to send the standard output of one process directly to the standard input of another process. The following are some commonly used pipeline examples:SHOW CONTENTS
|). In a pipeline, the standard output of one command is passed directly as the standard input to the next command.
cat file.txt | grep "pattern": Searches for patterns within text.cat file.txt | sort: Sorts the lines of text in a specified order (alphabetically by default).cat file.txt | wc -l: Counts the number of lines in a file.cat file.txt | tee output.txt: Outputs the content of a file to both the terminal and a specified file. 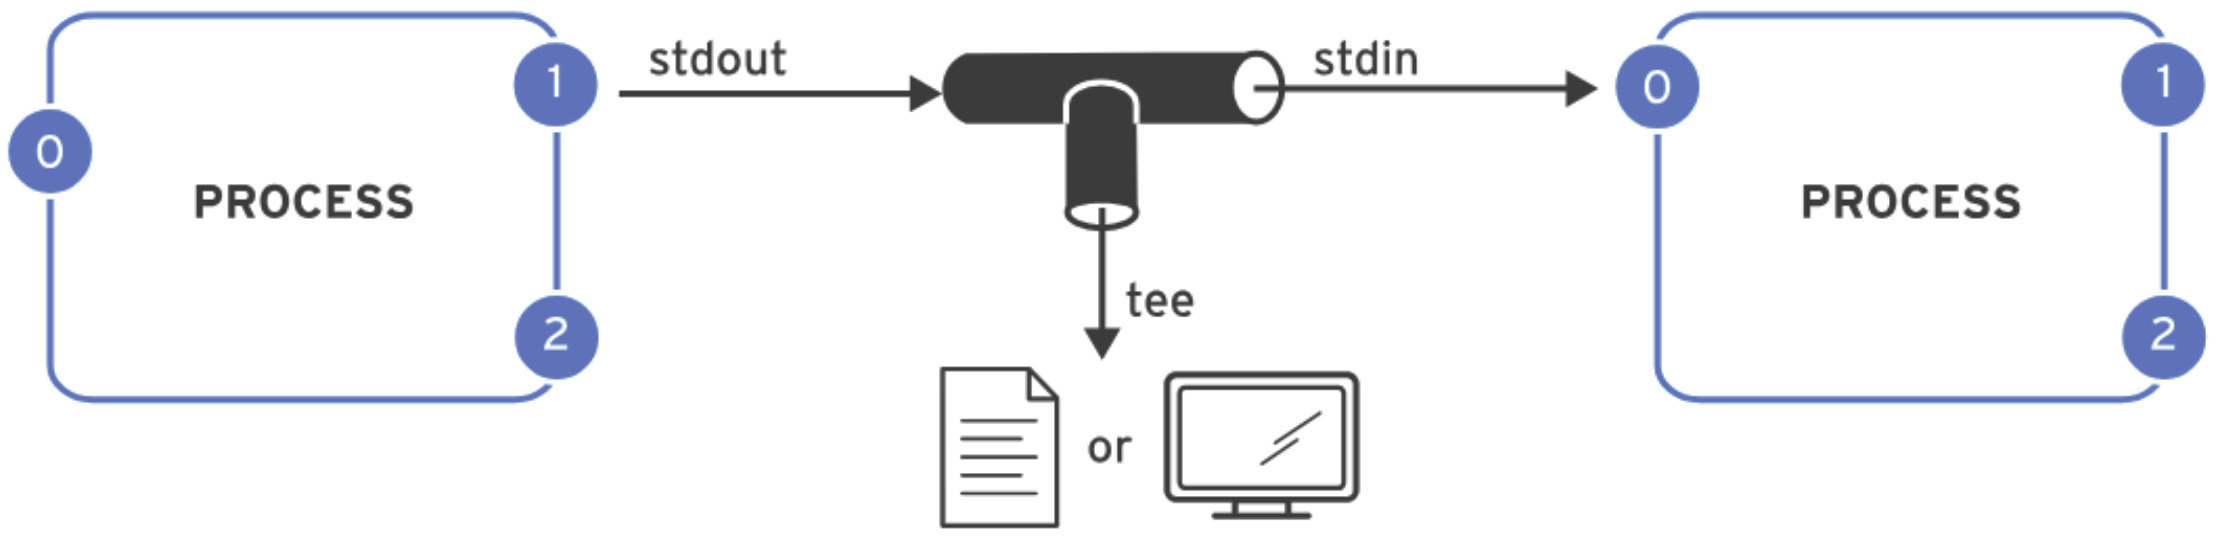
find / -name "passwd" 2>&1 | less:
find / -name "passwd": Searches for a file or directory named passwd starting from the root directory (/).2>&1: Redirects standard error (file descriptor 2) to standard output (file descriptor 1). This ensures that any error messages, such as permission denials, are also passed along with the normal output.| less: Pipes the combined output (standard output and error messages) into the less command.
5. Bash Environment Configuration
When Bash starts, several initialization scripts are executed to configure the shell environment, with the specific scripts depending on whether the shell is interactive, non-interactive, login, or non-login. An interactive shell allows users to enter commands directly, while a non-interactive shell runs in the background. A login shell is invoked when a user logs in via terminal or SSH, while non-login shell is opened from an existing session, like when launching a terminal in a GUI. For interactive login shells, the environment is configured by the SHOW CONTENTS
/etc/profile and ~/.bash_profile files, which also source /etc/bashrc and ~/.bashrc respectively. For interactive non-login shells, only /etc/bashrc and ~/.bashrc are used. System-wide configurations are stored in /etc/profile and /etc/bashrc, while user-specific configurations are in ~/.bash_profile and ~/.bashrc.
6. Manage Local Users and Groups
User & Group Concepts
A user is an individual account created on a Linux system that can own files, execute commands, and interact with the system. User details are typically stored in the In Linux, there are three primary types of users: A group is a collection of users that can be assigned a common set of permissions. The group details are typically stored in In Linux, there two main types of group: the primary group and the secondary group.SHOW CONTENTS
/etc/passwd file, where each line represents a user account with specific information like username, UID, home directory, and default shell.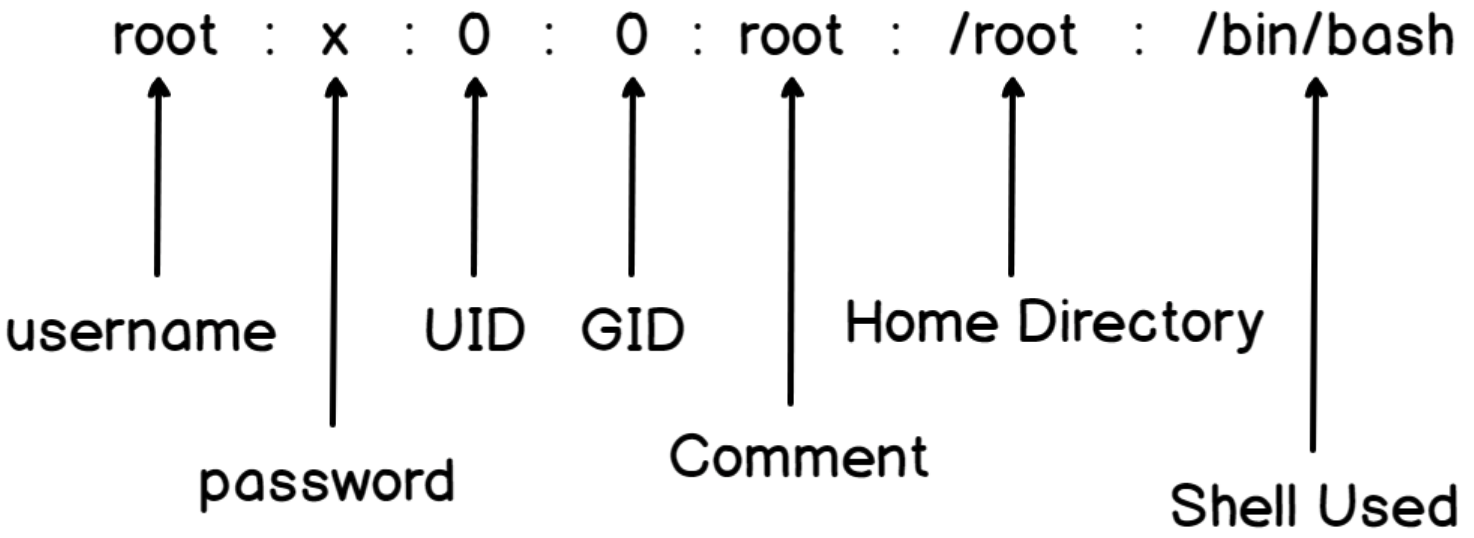
root with a UID of 0. It has full system access.
etc/group, which contains information about group names, GIDs, and the list of users that belong to each group.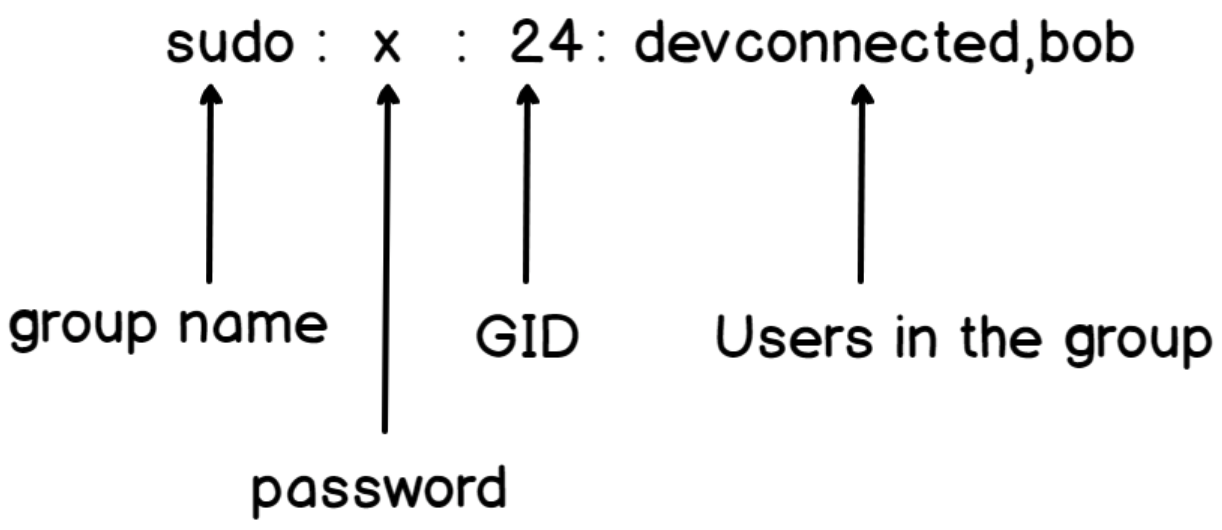
Gain Superuser Access
In RHEL 9, to switch from a regular user to a superuser (root), the If a regular user is not in the sudoers file, an error message such as " It’s important to use the SHOW CONTENTS
su command is used. To switch back from the root account to a regular user, the command su - user_name can be used, or alternatively, typing exit will return to the previous user account.
user_name is not in the sudoers file. This incident will be reported." will appear when trying to run a command with sudo. To enable full sudo access for a specific user, switch to the root account and then add the line user_name ALL=(ALL) ALL to the /etc/sudoers file. Similarly, to provide users in a specific group full sudo access, the line %group_name ALL=(ALL) ALL should be added.
visudo command to edit the /etc/sudoers file, as it performs syntax checks to avoid errors that could lock out users from using sudo.
Manage Local User Accounts
To create a user, use the SHOW CONTENTS
useradd command. When executing useradd user_name, it creates the user’s home directory, sets up the account information, and generates a private group for the user named user_name. The default configuration for creating a new user is defined in the /etc/login.defs file. Note that at this point, the user account does not have a valid password set, so the user cannot log in until a password is assigned. To set a password for the user, the passwd command should be used.
To delete a user, the userdel command is used. The userdel user_name command removes the user_name from the /etc/passwd file but leaves the user’s home directory intact. If it is necessary to delete the home directory as well, the userdel -r user_name option should be used. It’s important to note that when deleting a user without the -r option, the files owned by the user will be left with an unassigned UID. If a new account is later assigned to the same UID, that account will inherit the old user’s files, which poses a security risk. For this reason, many organizations prefer to lock user accounts instead of deleting them, in accordance with security policies.
Manage Local Group Accounts
The commands for managing local group accounts include Here are some commonly used commands for managing local group accounts:SHOW CONTENTS
groupadd, groupmod, and groupdel.
GID_MIN and GID_MAX variables in the /etc/login.defs file.
groupadd -g group_id group_name: Creates a new group with a specified GID.groupmod -n old_group_name new_group_name: Renames an existing group from old_group_name to new_group_name.groupmod -g group_id group_name: Changes the GID of an existing group (group_name) to a specified group id.usermod -aG group_name user_name: Adds a user (user_name) to an additional group (group_name) without removing the user from their existing groups. The -aG option ensures the user is appended to the group list rather than replacing the existing group memberships.newgrp group_name: Changes the current group to the named group.groupdel group_name: Deletes the specified group (group_name). Note that the primary group of any existing users cannot be deleted.
Manage User Passwords
In Linux, Here is the breakdown of the line from The Below are some commonly used There are common scenarios where user access needs to be restricted, such as temporarily blocking a user or disabling access for a former employee. Below are some common methods for restricting user access. Here are the descriptions for the mentioned commands:SHOW CONTENTS
/etc/passwd and /etc/shadow are critical system files that store user account information and password data, repectively. The /etc/passwd file contains basic information about user accounts on the system, while the /etc/shadow file is used to store encrypted user password information, as well as other related data such as password expiration and account locking details.
/etc/shadow: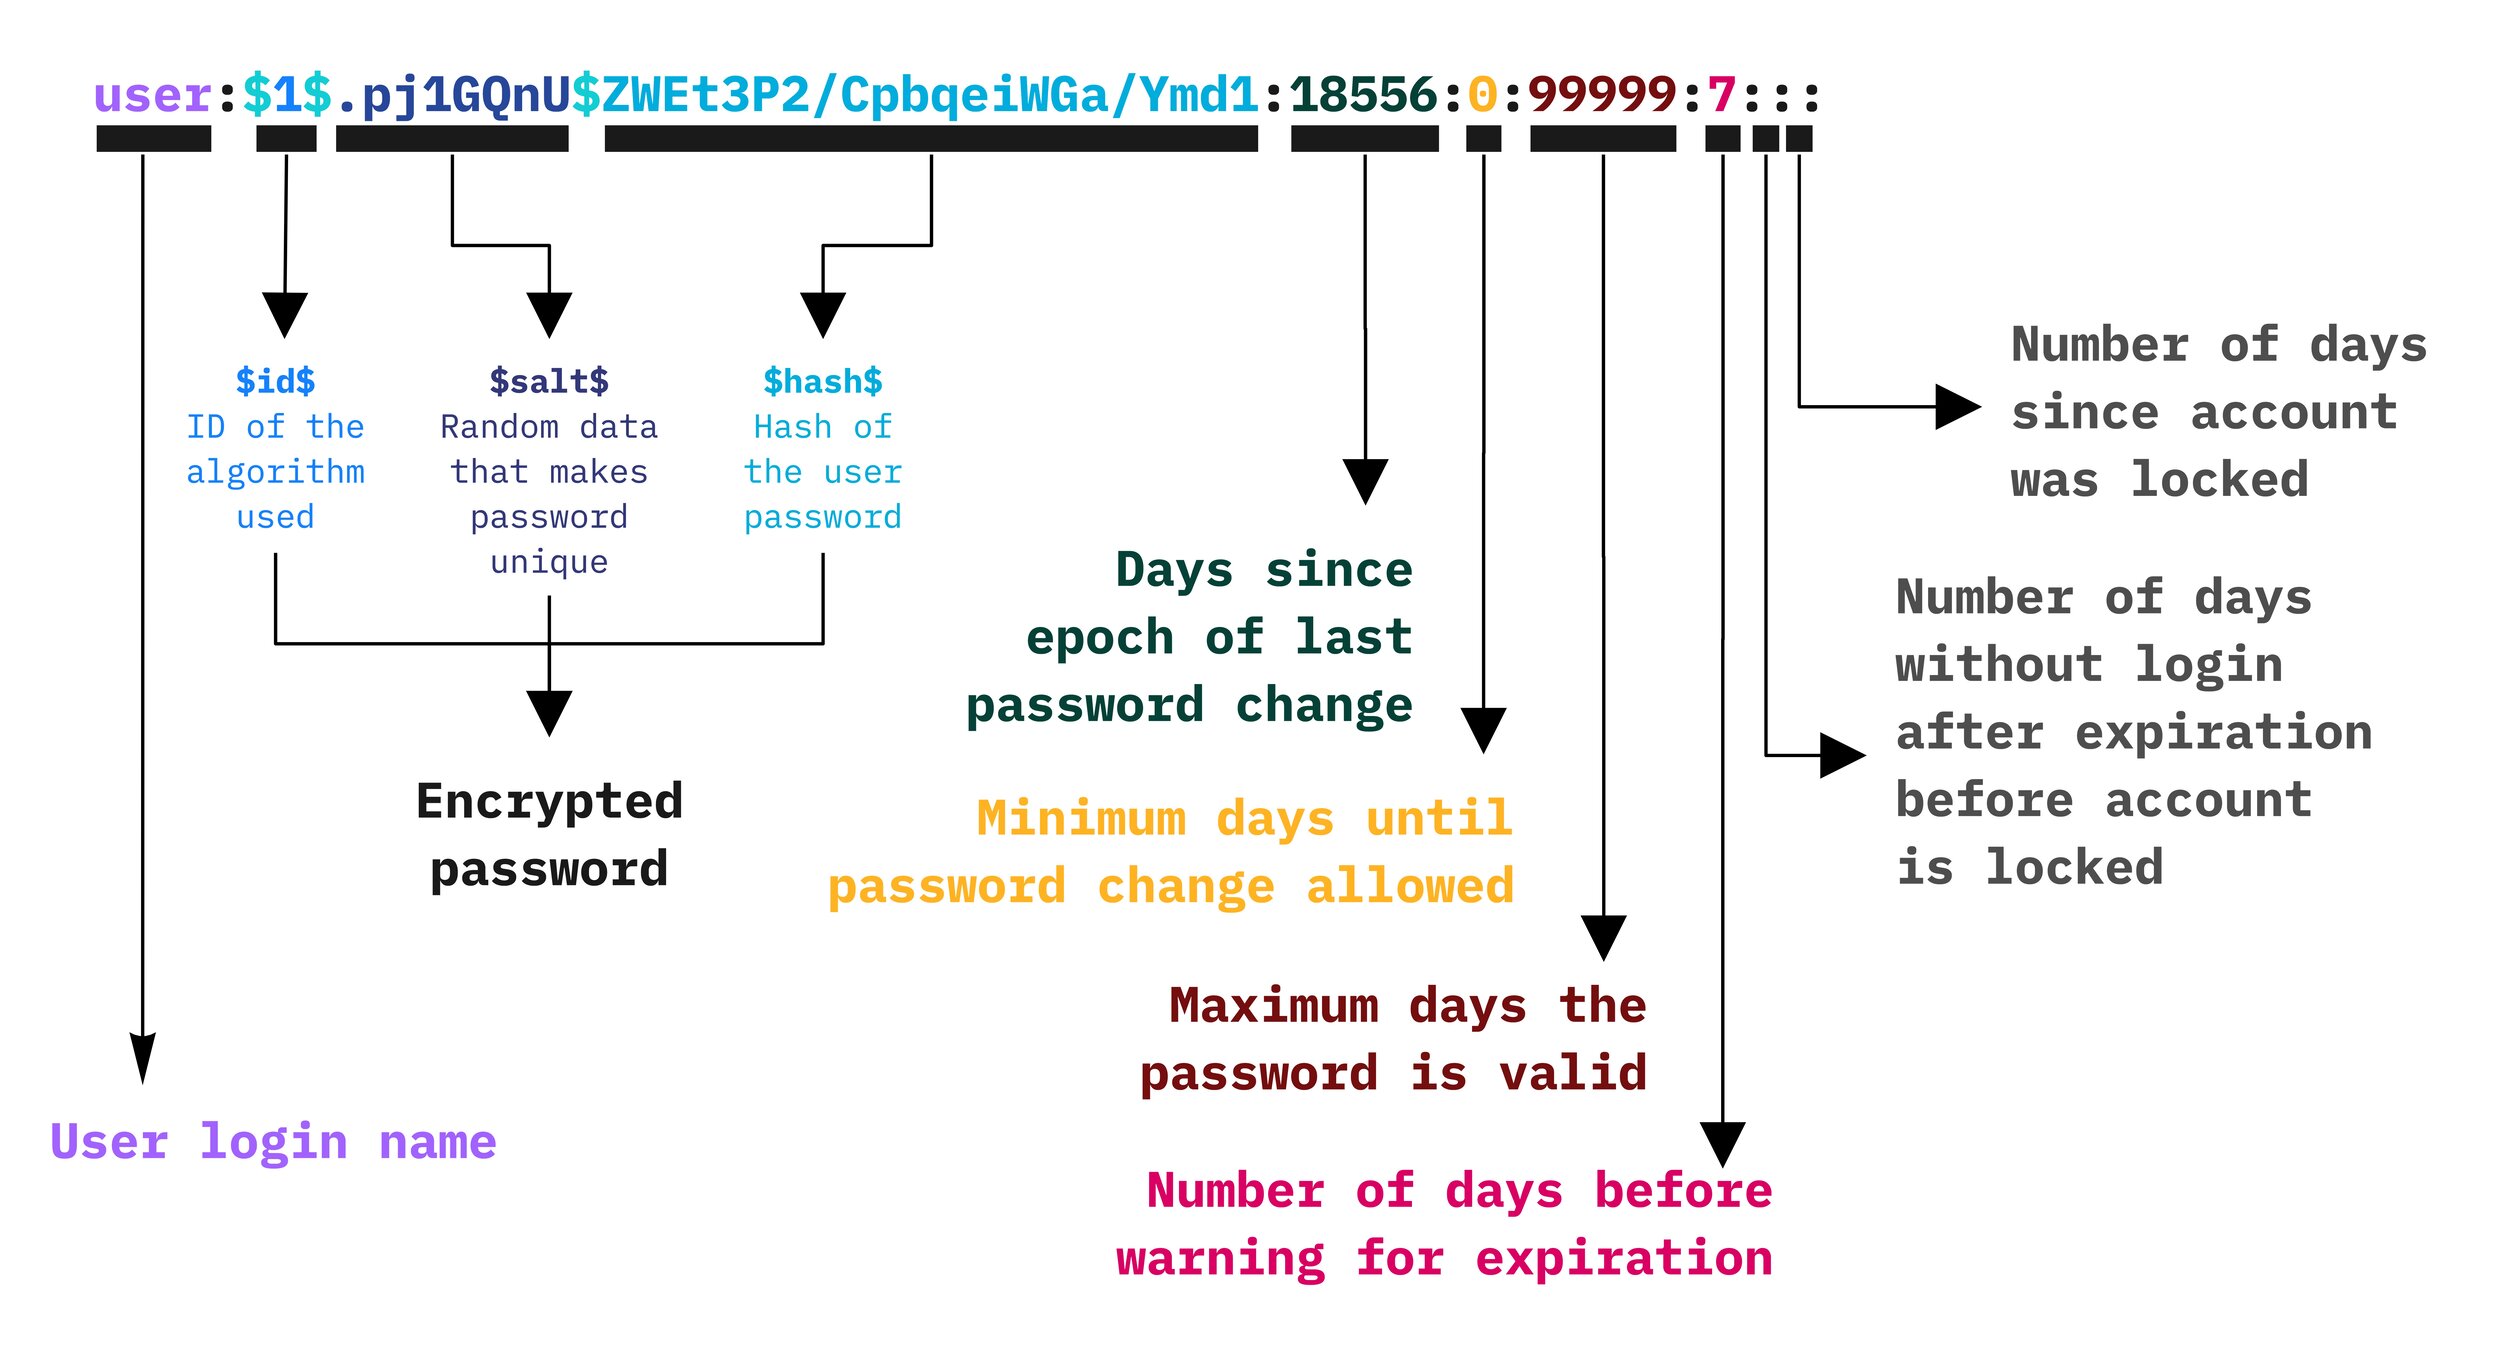
chage command is used to configure password aging parameters for user accounts, allowing administrators to manage password expiration, warning periods, and other related settings (as shown in the following image).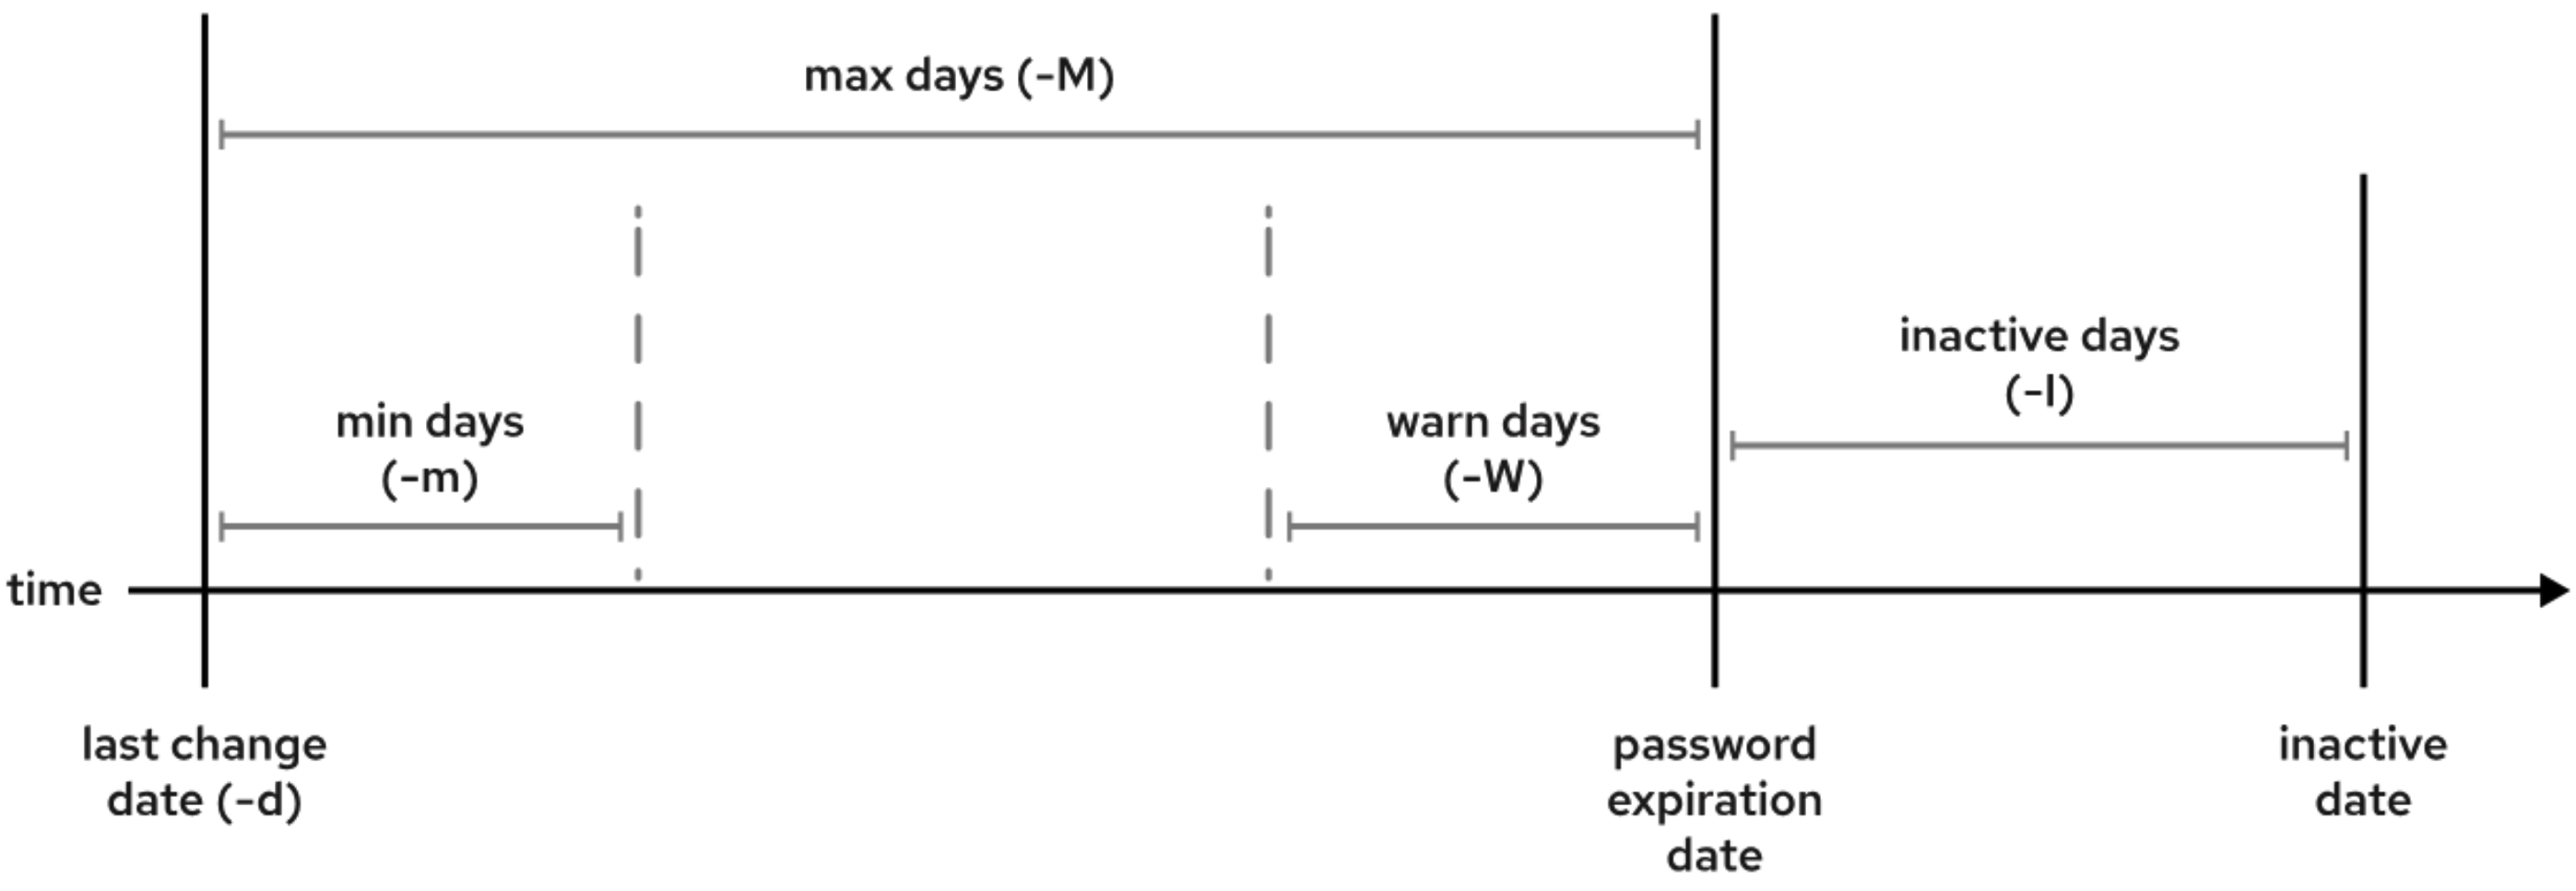
0) parameter specifies the minimum number of days that must pass before a user can change their password after setting it for the first time or after a password change. For example, if min days is set to 7, then after changing their password, the user will not be able to change it again until 7 days have passed.99999) parameter defines the maximum number of days that a user is allowed to use the current password. After this period, the user will be required to change the password. For example, If max days is set to 30, the user must change their password every 30 days. After 30 days, they will be prompted to change it.7) parameter specifies how many days before the password expires the user will be warned to change their password. The warning is displayed when the user logs in. For example, If warn days is set to 7, the user will receive a warning 7 days before the password expiration.None) specifies the date when the user’s account will be locked. If the inactivity days is set to 0, the account will be locked immediately after the expiration date. The inactivity days parameter (default is 7) defines the grace period after a password expires during which the user can still log in. During this period, the user is required to change the expired password using the passwd command before the account is locked. If the password is not changed within this grace period, the account will be locked. For example, if the expiration date is set to 2024-12-01 and the inactivity days is set to 7, the user can continue logging in until 2024-12-08. After 2024-12-08, the user’s account will be locked, and contact with an administrator will be necessary to reactivate the account.
chage commands:
chage -E $(date -d "+30 days" +%F) user_name: This command sets the expiration date of a user’s account to 30 days from the current date.chage -d 0 user_name: This command forces the user to change their password immediately.
usermod -L user_name: This command locks the user account by disabling the password. It works by placing an exclamation mark (!) in front of the password hash in the /etc/shadow file, preventing the user from logging in.usermod -L -e 2024-12-31 user_name: This command locks the user account and also sets an expiration date for the account.usermod -s /sbin/nologin user_name: This command changes the login shell for the user to /sbin/nologin, which prevents the user from logging in interactively. It’s important to note that this command does not prevent all types of access. Users may still be able to authenticate and upload or retrieve files through applications like file transfer programs or mail clients, as long as the user knows the password.
7. Control Access to Files
File System Permissions Concepts
In Linux, file system permissions control the access and actions that users can perform on files and directories. These permissions help manage security and determine who can read ( The first character in the file permission string represents the file type. Common file types include The first set represents the SHOW CONTENTS
r), write (w), or execute (x) a file. Permissions are typically displayed in a 10-character string, such as -rwxr-xr--. The 10 characters consist of a file type and three sets of permissions (User, Group, and Others):
- for regular files, d for directories, l for symbolic links, c for character device files, b for block device files, p for named pipe files, and s for local socket files.
user (owner) permissions. The second set represents the group permissions. The third set represents the others (everyone else) permissions. Each set of permissions is made up of three characters, corresponding to read (r), write (w), and execute (x). For example, rwx indicates full permissions (read, write, execute) and r-- stands for read-only permissions.
Manage File System Permissions
The To change the user or group ownership of a file or directory in Linux, the SHOW CONTENTS
chmod command is used to modify file system permissions for files and directories. The standard syntax is chmod [options] mode file_or_directory_name. The mode can be specified in either symbolic mode (e.g., r, w, x) or numeric mode (e.g., 755, 644). In numeric mode, permissions are represented by a three-digit number, where each digit corresponds to a set of permissions for the user, group, and others. Each permission is assigned a value: 4 for read, 2 for write, and 1 for execute. The sum of these values determines the permissions for each set. Below are some commonly used commands for changing file system permissions:
chmod 755 file: Grants read, write, and execute permissions to the user, and read and execute permissions to the group and others.chmod 644 file: Grants read and write permissions to the user, and read-only permissions to the group and others.chmod +x file: Adds execute permission for all user categories (user, group, and others).chmod -x file: Removes execute permission for all user categories.chmod u+x file: Adds execute permission for the user (owner) only.chmod g-w file: Removes write permission from the group.chmod o+r file: Grants read permission to others.
chown command is used. Only the root user can change the ownership of a file. However, both the file’s owner and the root user can modify the file’s group ownership. While the root user can assign file ownership to any group, regular users can change the group ownership of a file only if they are members of the target group. Below are some commonly used commands for changing the user or group ownership of a file or directory.
chown user_name file_name: Changes the owner of a file or directory to the specified user_name.chown user_name:group_name file_name: Changes both the owner and the group of a file or directory.chown :group_name file_name: Changes only the group ownership of the file or directory.chown -R user_name directory_name: Recursively changes the ownership of files and directories within the specified directory.chgrp group_name file_name: Changes only the group ownership of a file or directory to the specified group_name.chgrp -R group_name directory_name: Recursively changes the group ownership of files and directories within the specified directory.
Sepcial Permissions & Default Permissions
In Linux, special file permissions provide advanced control over file and directory access. These permissions include setuid, setgid, and the sticky bit. In Linux, when a file or directory is created, its default permission is determined by the combination of the initial permission and the umask (user file creation mask). By default, files are created with initial permissions of SHOW CONTENTS
s in the user permission set. When set on an executable file, it allows the program to be executed with the privileges of the file owner (usually root) rather than the privileges of the user running the file. For example, the file /usr/bin/passwd is owned by the root user, but it can be executed by a regular user without sudo because it has the setuid permission in the user permission set (-rwsr-xr-x. 1 root root 32648 Aug 10 2021 /usr/bin/passwd).s in the group permission set. When applied to a file, it causes the program to run with the group privileges of the file’s group. For directories, it ensures that files created within the directory will inherit the directory’s group rather than the user’s group. For example, the file /usr/bin/locate (-rwx--s--x. 1 root slocate 41032 Aug 10 2021 /usr/bin/locate) has the setgid permission in the group permission set, allowing it to run with the group privileges of the file’s group. Similarly, the directory /run/log/journal (drwxr-sr-x+ 3 root systemd-journal 60 Apr 15 09:44 /run/log/journal/) has the setgid permission in the group permission set. This ensures that files created within the directory will inherit the systemd-journal group.t in the others’ permission set. When applied to a directory, it allows only the file owner to delete or modify their files, preventing other users from tampering with them. For example, the directory /tmp (drwxrwxrwt. 20 root root 4096 Apr 17 08:32 /tmp) has the sticky bit set in the others’ permission set. This ensures that a user can only modify or delete the files in the /tmp directory that they own.
0666 (-rw-rw-rw-), and directories with 0777 (drwxrwxrwx). The umask defines which permission bits should be removed from these initial values, Typically, the default umask is 0022. This value can be modified in /etc/bashrc. For example, if the umask is set to 0022, a newly created file will have permissions 0644 (-rw-r--r--) because 0666 - 0022 = 0644. Similarly, a newly created directory will have permissions 0755 (drwxr-xr-x) because 0777 - 0022 = 0755.
8. Monitor & Manage Linux Processes
Process Life Cycle & States
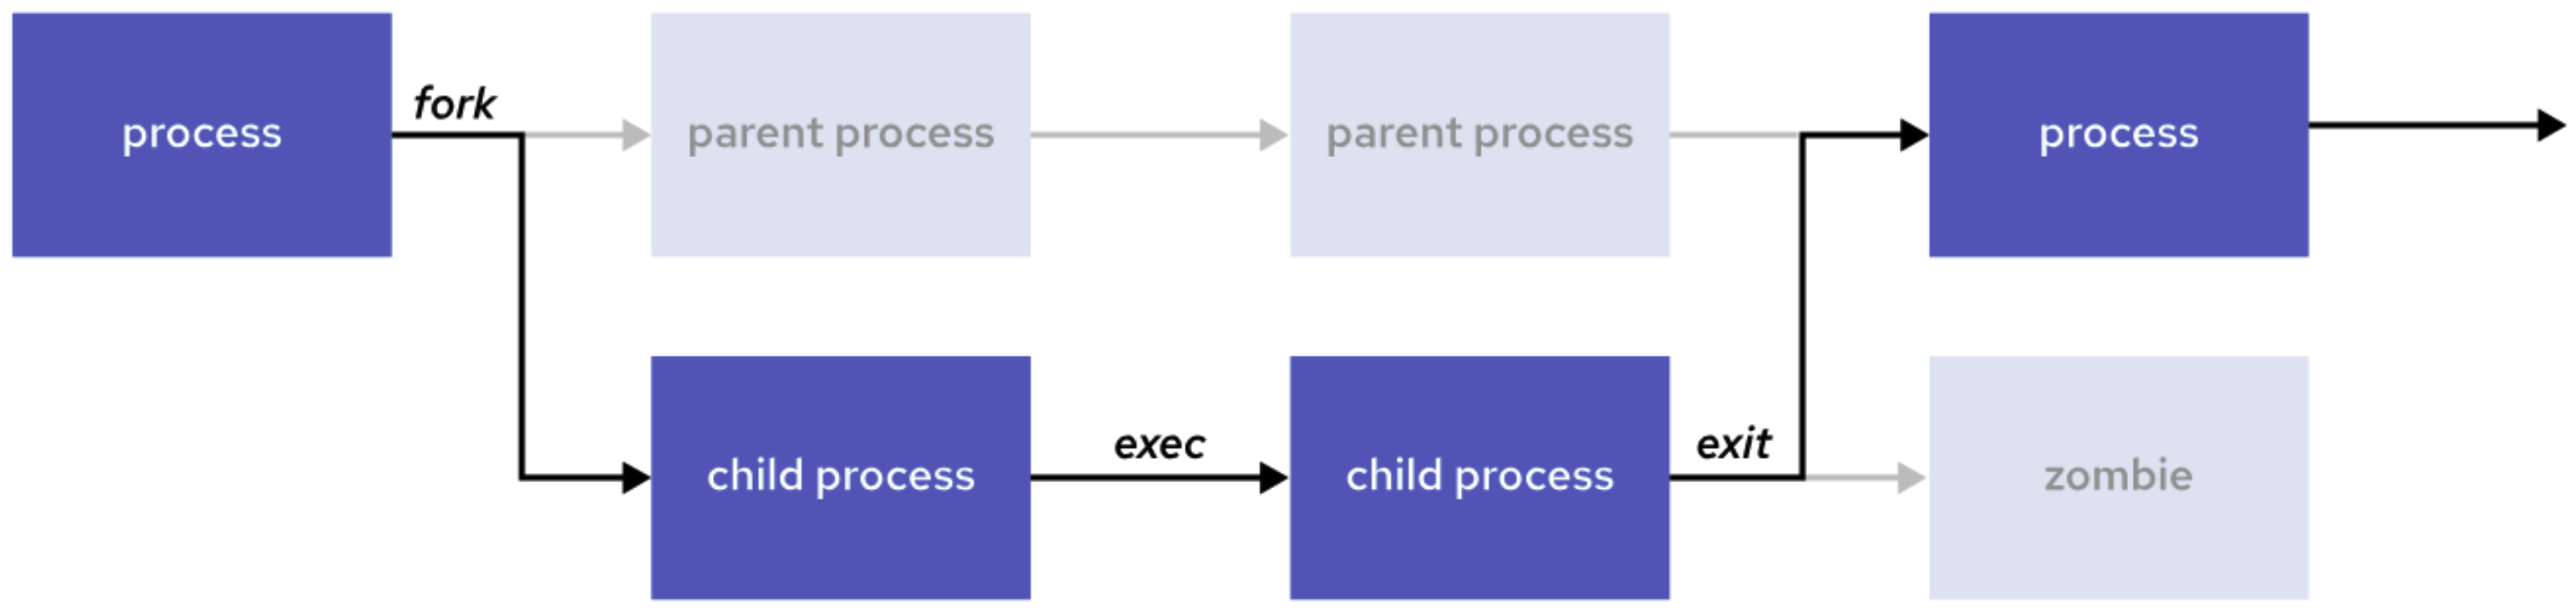
A process is a running instance of an executable program. Once created, a process includes several key components: an address space for allocated memory, security properties such as ownership and privileges, one or more execution threads for running code, and a process state that reflects its current status. The environment of a process contains important contextual information, including local and global variables, the current scheduling context, and system resources like file descriptors and network ports that are assigned to the process. A new process is typically created when an existing parent process duplicates its own address space through a mechanism called a process fork. The resulting child process is assigned a unique Process ID (PID) for identification and security purposes. The child process also records the Parent Process ID (PPID) as part of its environment. On systems like Red Hat, all processes ultimately descend from the first system process, Through the fork operation, the child process inherits the parent’s security credentials, file descriptors, resource privileges, environment variables, and program code. Once forked, the child process can continue running the same code or replace it with its own program logic using an Typically, after creating a child process, the parent process enters a waiting state, pausing its own execution until the child finishes. When the child process exits, it releases its resources, but its process table entry remains temporarily as a zombie process. Once the parent receives a termination signal from the child, it performs cleanup by removing the zombie entry from the process table, freeing the last of the child’s resources, and then resumes its own execution. In Linux, every process moves through a series of well-defined states during its lifecycle. The following image and table describe Linux process states in detail. TASK_INTERRUPTIBLE:
TASK_UNINTERRUPTIBLE:
TASK_KILLABLE:
TASK_REPORT_IDLE:
Flags TASK_UNINTERRUPTIBLE and TASK_NOLOAD are set. Similar to TASK_KILLABLE, also a subset of state D. It accepts fatal signals. In Linux, the SHOW CONTENTS
systemd.exec family function.

Name
Flag
Kernel-defined state name and description
Running
R
TASK_RUNNING: The process is either executing on a CPU or waiting to run. The process can be executing user routines or kernel routines (system calls), or be queued and ready when in the Running (or Runnable) state.
Sleeping
S
TASK_INTERRUPTIBLE: The process is waiting for some condition: a hardware request, system resource access, or signal. When an event or signal satisfies the condition, the process returns to Running.
D
TASK_UNINTERRUPTIBLE: This process is also sleeping, but unlike S state, does not respond to signals. Used only when process interruption might cause an unpredictable device state.
K
TASK_KILLABLE: Identical to the uninterruptible D state, but modified to allow a waiting task to respond to the signal that it should be killed (exit completely). Utilities frequently display Killable processes as D state.
I
TASK_REPORT_IDLE: A subset of state D. The kernel does not count these processes when calculating load average. Used for kernel threads. Flags TASK_UNINTERRUPTIBLE and TASK_NOLOAD are set. Similar to TASK_KILLABLE, also a subset of state D. It accepts fatal signals.
Stopped
T
TASK_STOPPED: The process is stopped (suspended), usually by being signaled by a user or another process. The process can be continued (resumed) by another signal to return to running.
T
TASK_TRACED: A process that is being debugged is also temporarily stopped and shares the same T state flag.
Zombie
Z
EXIT_ZOMBIE: A child process signals to its parent as it exits. All resources except for the process identity (PID) are released.
X
EXIT_DEAD: When the parent cleans up (reaps) the remaining child process structure, the process is now released completely. This state cannot be observed in process-listing utilities.
ps and top commands are commonly used to inspect processes. The ps command displays information about active processes and is typically used to capture a snapshot of the processes running at a specific moment. In contrast, the top command provides a real-time, dynamic view of system processes, continuously updating to show CPU usage, memory usage, uptime, load average, and resource consumption for each process.
Control Jobs
In Linux, a job refers to a command or a group of commands initiated from a terminal by a user. Jobs can run in two modes: as a foreground job or a background job. A foreground job occupies the terminal until it completes, while a background job runs independently, allowing the terminal to remain available for other tasks. For example, executing A process is a running instance of a program. When a job is initiated, one or more processes are created to perform the assigned tasks. For example, typing A pipeline is a sequence of commands connected by the A session is a collection of processes initiated from a single user login. The first process created in a session is known as the session leader. For example, when a user logs in to a server via In Linux, job control allows management of multiple jobs (commands or processes) within a single terminal session. Job control makes it possible to pause, resume, move jobs between the foreground and background, or terminate them. Below are the common-use commands for job control:SHOW CONTENTS
vim file.txt starts a foreground job, which holds the terminal until the editor is closed. Running sleep 300 & starts a background job, allowing the terminal to remain usable while the command runs for 300 seconds in th e background.
ls -l creates a new process to handle the application.
| operator, where the output of one command is passed directly as input to the next. For example, the command ps aux | grep nginx | sort forms a pipeline involving three separate processes working in succession. In this case, a pipeline runs as one job, but each part is a separate process.
ssh user_name@ip_address, the shell process (bash, zsh, etc.) acts as the session leader. All jobs and processes started from that terminal belong to the same session.
Ctrl + Z: Suspends the current foreground job and puts it into the background in a stopped state.bg: Resumes a suspended job in the background.fg: Brings a background job back to the foreground.jobs: Lists all jobs associated with the current terminal session, showing each job’s ID and status (e.g., running, stopped). In the output, a + next to a job ID denotes the current default job, which is the target of any bg or fg command issued without a %jobID. A - marks the previous job, which will become the default once the current default job completes or is removed. For example:
[1]   Running                 sleep 100 &
[2]   Running                 sleep 100 &
[3]-  Running                 sleep 100 &
[4]+  Running                 sleep 100 &
kill %job_number: Sends a signal (default is SIGTERM) to terminate a job, identified by its job number.Ctrl + C: Terminates a foreground job.
Kill Processes
In Linux, processes can be terminated using signals. A signal is a software interrupt that is delivered to a process. The following table describes common signals. Note that while signal numbers may vary across different Linux hardware platforms, signal names and their meanings remain consistent. It is generally recommended to use signal names rather than numbers when sending signals. Additionally, Red Hat advises sending Here are some commonly used commands related to terminating processes: In real-world scenarios, system administrators can forcibly terminate a user’s session to log them out. The following example demonstrates this process:SHOW CONTENTS
Signal
Number
Description
SIGTERM15
Graceful termination (default)
SIGKILL9
Forcefully kill (non-catchable)
SIGINT2
Interrupt from keyboard (
Ctrl+C)
SIGHUP1
Hang up / restart daemon
SIGSTOP19
Stop (pause) a process
SIGCONT18
Resume a stopped process
SIGTERM first to allow the process to terminate gracefully, followed by SIGINT if necessary. If both signals fail, SIGKILL should be used as a last resort. The SIGKILL signal cannot be caught or ignored, and it forcibly terminates the process without giving it an opportunity to perform any self-cleanup.
kill PID: Sends the SIGTERM signal to the specified process, requesting it to terminate gracefully.kill -SIGKILL PID: Sends the SIGKILL signal to forcefully terminate the specified process immediately (cannot be caught or ignored).killall process_name: Sends SIGTERM to all processes matching the given name, attempting a graceful termination.killall -SIGKILL process_name: Sends SIGKILL to all processes matching the given name, forcing termination.pgrep process_name: Searches for processes matching the given name and returns their PIDs.pgrep -u user_name process_name: Searches for processes with the specified name owned by a specific user.pkill process_name: Sends SIGTERM to all processes matching the given name, similar to killall.pkill -SIGKILL process_name: Sends SIGKILL to all processes matching the given name, forcing termination.pkill -u user_name: Sends a signal to all processes owned by the specified user.pstree -p: Displays the process tree with PIDs included.pstree -u: Displays the process tree with associated user names.
who -u                  # Lists all active user sessions along with their associated PIDs.
pkill -t pts/0          # Sends SIGTERM (default) to processes attached to terminal pts/0.
pkill -SIGINT -t pts/0  # If necessary, sends SIGINT to the same terminal.
pkill -SIGKILL -t pts/0 # As a last resort, sends SIGKILL to forcefully terminate the session.
Monitor Process Activity
In Linux, the load average indicates the system’s workload over a period of time, measuring how many processes are either actively running or waiting to be executed by the CPU. The load average is typically represented by three numbers, corresponding to the system load over the past 1, 5, and 15 minutes. A load average of 1.0 per CPU is considered fully utilized, meaning that each CPU is handling one process at a time. For example, if a system has 2 CPUs, a load average of 2.0 would mean that the system is fully utilized. To inspect the number of CPUs in the system, the For instance, if a system has 2 CPUs and the SHOW CONTENTS
lscpu command can be used.
uptime command returns:20:41:31 up 5:29, 3 users, load average: 3.32, 1.90, 0.32
9. Control Services & Daemons
In Linux, systemd daemon is the system and service mamager repsonsible for initializing the system during boot and managing processes throughout the machine’s lifetime. It handles the startup sequence, maintains service states, sepervises processes, and managees logging and dependencies. systemd uses the concept of units to manage and control system resources. A unit represents a single object that systemd knows how to manage, such as a service, a device, a mount point, or a socket. Each unit is defined by a unit file, which describes how systemd should handle it — including how to start, stop, reload, and manage dependencies. Unit files are typically stored in directories like Units are categorized by type, and the type is reflected in the file extension. Common unit types include: To interact with systemd, the systemctl is used. It allows administrators to manage services, check system states, enable or disable services at boot, and control system targets. Here are some commonly used commands:SHOW CONTENTS
/usr/lib/systemd/system/ or /etc/systemd/system/.
.service: for system services (e.g., nginx.service).socket: for socket activation.target: for grouping units into milestones or states (like multi-user.target, graphical.target).mount: for filesystem mount points.timer: for time-based activation, like a cron replacement.device: for hardware devices.path: for path-based activation
systemctl status nginx: Displays the status of the nginx service.systemctl start nginx: Starts the nginx service.systemctl stop nginx: Stops the nginx service.systemctl restart nginx: Restarts the nginx service.systemctl enable nginx: Configures nginx to start automatically at boot.systemctl disable nginx: Disables automatic start at boot for nginx.systemctl reload-or-restart nginx: Reload the configuration if supported; otherwise, restart the service.systemctl is-enabled nginx: Check if the service is enabled to start at boot.systemctl is-active nginx: Check if the service is currently running.systemctl list-dependencies nginx: List the dependencies of the service.systemctl mask sendmail.service: Mask the service to prevent it from being started.systemctl unmask sendmail.service: Unmask the service to allow it to be started again.systemctl list-units --type=service: Lists all active services.systemctl reboot: Reboots the system.systemctl poweroff: Powers off the machine.
10. Configure & Secure SSH
SSH (Secure Shell) is a protocol used to securely access and manage remote systems over an unsecured network. It provides encrypted communication between a client and a server, allowing for secure login, command execution, and file transfer. Here are common SSH usage examples: SSH also allows passwordless login to a remote server by using a pair of cryptographic keys: A private key and a public key. A private key is kept on the client machine while the public key is stored on the remote server in The default configuration of the SSH server works well for many use cases. To apply custom settings (e.g., disable remote login as SHOW CONTENTS
ssh user@host: Connect to a remote server using the specified user account.ssh user@host command: Execute a command on the remote server without opening an interactive shell.
~/.ssh/authorized_keys. When connecting, the server uses the public key to verify the client’s private key. If the key match, the connection is granted without prompting for a paasword. To enable this feature, following the following steps:
ssh-keygen -t rsa -b 4096 -C "RHEL 9 ON Virtual Machine": Generate a key pair on the client.ssh-copy-id user_name@ip_address: Copy the public key to the remote server.ssh user_name@ip_address: Connect to the server.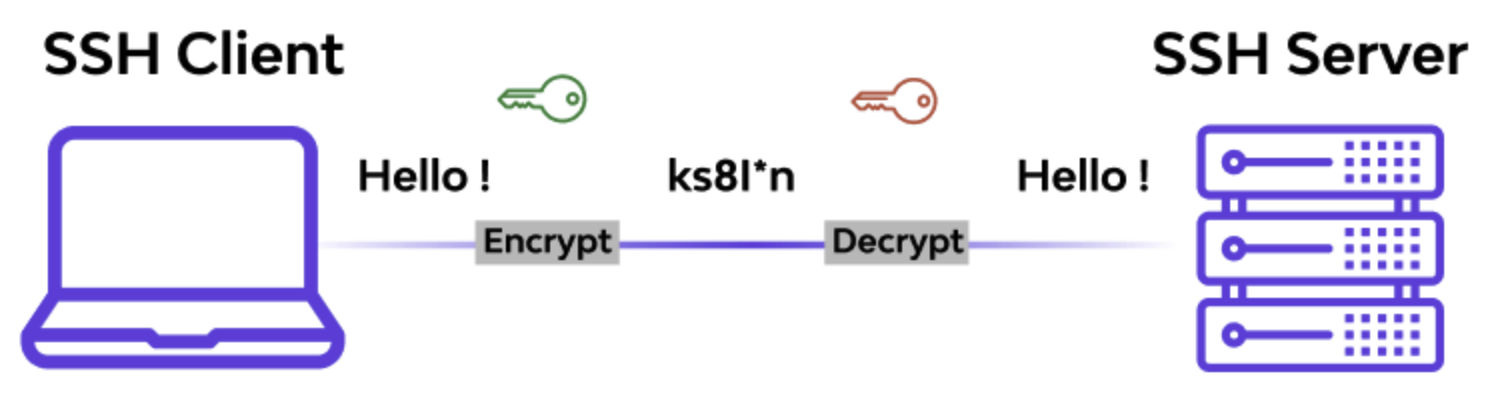
root), edit the /etc/ssh/sshd_config file, modify the field PermitRootLogin to no. After modifying the configuration, apply the changes by running systemctl reload ssh.
11. Analyze & Store Logs
System Log Architecture
In Red Hat Enterprise Linux, the standard logging system is based on the Syslog protocol, and the The systemd-journald service forms the core of the operating system’s event logging architecture. It collects event messages from multiple sources, such as the system kernel, output from the early stages of the boot process, standard output and standard error from daemons, and Syslog events. On the other hand, the rsyslog service reads syslog messages that SHOW CONTENTS
systemd-journald and rsyslog services are responsible for handling syslog messages.
systemd-journald restructures these logs into a standard format and writes them into a structured, indexed system journal. By default, this journal is stored in a file system that does not persist across reboots.
systemd-journald receives from the journal as they arrive. It then processes the syslog events and records them to log files or forwards them to other services according to its configuration. The rsyslog service sorts and writes syslog messages to log files in the /var/log directory, which are persistent across reboots. This directory not only contains syslog message files but also log files from other services on the system. Below is a list of some useful log files located in the /var/log directory:
Log File
Description
/var/log/messagesLogs most system messages, including general syslog messages. Exceptions include authentication-related messages, email processing, scheduled job execution, and debug information.
/var/log/secureLogs security-related messages, including authentication events and user access information.
/var/log/maillogLogs messages related to the mail server, including both mail delivery and other mail-related operations.
/var/log/cronLogs messages related to the execution of scheduled jobs (cron jobs).
/var/log/boot.logLogs non-syslog console messages related to system startup and boot processes.
Review Syslog Files
In Linux, each log message is categorized by facility (which subsystem produces the message) and priority (the message’s severity). The following table lists the standard syslog facilities. The following table lists the standard syslog priorities in descending order. The rsyslog service uses the facility and priority of log messages to determine how to handle them. Rules configure this facility and priority in the To prevent log files from consuming too much disk space, Linux uses log rotation, a utility that automatically handles the archiving, compressing, and deletion of old log files. A scheduled job runs the The The SHOW CONTENTS
Code
Facility
Description
0
kern
Kernel messages
1
user
User-level messages
2
mail
Mail system messages
3
daemon
System daemons messages
4
auth
Authentication and security messages
5
syslog
Internal syslog messages
6
lpr
Printer messages
7
news
Network new messages
8
uucp
UUCP protocol messages
9
cron
Clock daemon messages
10
authpriv
Non-system authorization messages
11
ftp
FTP protocol messages
16-23
local0 to local7
Custom local messages
Code
Priority
Description
0
emerg
System is unusable
1
alert
Action must be taken immediately
2
crit
Critical condition
3
err
Non-critical error condition
4
warning
Warning condition
5
notice
Normal but significant event
6
info
Informational event
7
debug
Debugging-level message
/etc/rsyslog.conf file and in any file in the /etc/rsyslog.d directory with the .conf extension.
logrotate command daily to check if any log files need to be rotated. When a log file is rotated, it is renamed with an extension indicating the rotation date. For example, the old /var/log/messages file might be renamed to /var/log/messages-20250419 when it is rotated on April 19, 2025. After rotations, typically over four weeks, the oldest log files are discarded to free up disk space.
tail -f command in Linux is commonly used for monitoring log files in real time. It allows users to continuously view the latest entries being added to a log file, which is especially useful for monitoring system events and troubleshooting. Here is a sample example:tail -f /var/log/secure # In the first terminal
ssh signalyu999@ip_address # In the second terminal
logger command sends messages to the rsyslog service, which is useful for testing changes to the rsyslog configuration. By default, it logs messages with the user facility and notice priority (user.notice), unless specified otherwise using the -p option. For example, to send a message to the rsyslog service and have it recorded in the /var/log/boot.log log file, the following logger command can be used:# /etc/rsyslog.conf
# Save boot messages also to boot.log
# local7.* /var/log/boot.log
logger -p local7.notice "Log entry created on host"
# TEST
# 1. In the first terminal: tail -f /var/log/boot.log
# 2. In the second terminal: logger -p local7.notice "Log entry created on host"
Review System Journal Entries
The systemd-journald service stores log data in a structured, indexed binary file called the journal. To retrieve log messages from the journal, the SHOW CONTENTS
journalctl command is used. Below are some commonly used commands:
journalctl --since "2025-04-18" --until "2025-04-19": Shows logs from April 18, 2025, to April 19, 2025.journalctl --since "today": Displays logs from the current day (since midnight).journalctl --since "-1 hour": Shows logs from the last hour.journalctl --since "-10 minutes": Displays logs from the last 10 minutes.journalctl -n 50: Shows the last 50 log entries.journalctl -u sshd: Displays logs related to the sshd service (SSH daemon).journalctl -f: Continuously shows the latest log entries in real-time.journalctl -p err: Filters and shows logs with “error” priority or higher.journalctl _PID=1234: Shows logs related to the process with PID 1234.journalctl _SYSTEMD_UNIT=sshd.service: Displays logs related to the sshd.service systemd unit.journalctl -b: Shows logs from the current boot session.
Preserve the System Journal
The systemd-journald service stores log data in a structured, indexed binary format known as the system journal. By default, Red Hat Enterprise Linux 9 stores the system journal in the The Storage parameter has four options:SHOW CONTENTS
/run/log directory, and the system clears the system journal after a reboot. To change this behavior and retain logs across reboots, the Storage parameter in the /etc/systemd/journald.conf file can be set to persistent. After modifying the configuration, the systemd-journald service must be restarted for the changes to take effect.
/var/log/journal directory, ensuring logs persist across reboots. If the /var/log/journal directory does not exist, the systemd-journald service creates it automatically./run/log/journal directory. These logs are lost upon reboot./var/log/journal directory exists, logs are stored persistently. If the directory does not exist, volatile storage is used. This is the default behavior of the Storage parameter.
Maintain Accute Time
In Linux, maintaining accurate system time is crucial for tasks such as logging, scheduling, and ensuring syschronization across different systems. Time syschronization is typically achieved through the use of the NTP (Network Time Protocol). The NTP is a standard way for machines to provide and obtain correct time information over the internet. Maintaing accurate time commonly involves two commands: The chrond service keeps on track the usually inaccurate local Real-Time-Clock (RTC) by synchronizing it to the configured NTP servers. If network connectivity is unavailable, it calculates the RTC drift and stores the data in a file specified by the SHOW CONTENTS
tzselect and timedatectl. The tzslect command is an interactive utility used to select a time zone on Linux systems. It guides users through a series of prompts to set the time zone by selecting regions and cities form a list. It is helpful when users do not know the exact time zone string. The timedatectl command is provided by systemd to manage time and time zone settings on Linux systems. It allows users to query and set the system’s time, date, and time zone, as well as synchronize the system clock with NTP. Here are some common sample examples of timedatectl:
timedatectl status: Displays the current time zone, NTP status, and system time information.sudo timedatectl set-time "YYYY-MM-DD HH:MM:SS": Sets the system date and time manually.sudo timedatectl set-timezone <timezone>: Changes the system’s time zone.timedatectl list-timezones: Lists all available time zones.sudo timedatectl set-ntp true: Enables NTP (Network Time Protocol) synchronization.sudo timedatectl set-ntp false: Disables NTP synchronization.sudo timedatectl set-local-rtc true: Sets the system clock to local time (RTC).sudo timedatectl set-local-rtc false: Sets the system clock to UTC (coordinated universal time).timedatectl show: Displays detailed information about the time and date settings.
driftfile parameter in the /etc/chrony.conf configuration file. By default, chronyd uses servers from the NTP Pool Project but can be configured to use different servers for isolated networks. NTP servers are categorized by their stratum, with stratum 0 being a reference clock and higher strata representing servers that sync with other NTP servers. In the configuration file, servers and peers are defined, with the server being one stratum above the local server and peers at the same level. The iburst option is recommended for faster and more accurate initial synchronization.
12. Manage Networking
Networking Related Commands
SHOW CONTENTS
ip: A versatile tool for managing network interfaces, routing, and tunneling.
ip addr pr ip a: Show IP addresses assigned to all interfaces.ip addr add 192.168.1.100/24 dev eth0: Assign an IP address to an interface.ip link or ip l: Show network interfaces and their status.ip link set eth0 up: Enable (bring up) a network interface.ip link set eth0 down: Disable (bring down) a network interface.ip route or ip r: Display the current routing table.ip route add 192.168.2.0/24 via 192.168.1.1: Add a static route.ip route del 192.168.2.0/24: Delete a route.ip neigh: Show the ARP table (neighbor cache).ss: A utility to investigate sockets. It is used for displaying information about network connections, listening ports, etc.
ss: Display all established sockets and connections.ss -t: Show only TCP connections.ss -u: Show only UDP connections.ss -l: Show listening sockets.ss -tunlp: Show TCP/UDP listening ports with process info (-p).ss -s: Display a summary of socket statistics.ss -t state established: Show established TCP connections.ss -an: Show all sockets (listening and non-listening) in numeric format.ss -o state established: Show established connections with timers.ping: A tool used to test network connectivity between the client and the remote host by sending ICMP echo requests.
ping baidu.comtraceroute: A tool to trace the path packets take to reach a network destination, showing each hop along the way.
traceroute <hostname/IP>: Trace the route packets take to reach the target host.traceroute -n <hostname/IP>: Show IP addresses only, skip hostname resolution (faster).traceroute -m 20 <hostname/IP>: Set maximum number of hops to 20.traceroute -p 80 <hostname/IP>: Use destination port 80 (helpful for testing web servers).traceroute -I <hostname/IP>: Use ICMP ECHO instead of UDP packets.traceroute -T <hostname/IP>: Use TCP SYN packets instead of UDP (helpful for firewalled networks).tracepath: A simpler version of traceroute that shows the path packets take to a destination but also provides information about packet loss and latency along the way.
tracepath <hostname/IP>: Trace the path to a destination, showing each network hop along the way.tracepath -n <hostname/IP>: Display IP addresses only, skip reverse DNS lookup (faster).tracepath6 <hostname/IP>: Use IPv6 to trace the route to the target.host: A simple DNS lookup tool that resolves domain names to IP addresses.
host <domain>: Resolve a domain name to its IP address.dig: A DNS lookup tool that queries the Domain Name System (DNS) for information about hostnames, IP addresses, and other DNS records.
dig <domain>: Query the default DNS records (usually A records) for a domain.nmcli: A command-line interface for NetworkManager, used for manageing network connections and settings, such as configuring interfaces, VPNs, and Wi-Fi.
nmcli device status or dev con status: Show the status of all network interfaces.nmcli connection show or nmcli con show: List all saved network connections.nmcli connection up <connection-name>: Activate a network connection.nmcli connection down <connection-name>: Deactivate a network connection.nmcli device connect <device>: Connect a network device.nmcli device disconnect <device>: Disconnect a network device.getent: A command used to query various system databases, including DNS, password, group, and hosts. It is useful for retriving information that’s typically stored in files like /etc/hosts or through services like DNS.
getent hosts <hostname>: Resolve a hostname to its IP address (similar to host or nslookup).getent services <service>: Lookup port and protocol for a service (e.g., getent services ssh).getent protocols: List network protocols.getent passwd: List all user account entries from /etc/passwd or configured name service.getent passwd <username>: Query information for a specific user.getent group: List all group entries from /etc/group or configured name service.getent group <groupname>: Query information for a specific group.
Configure Network
In RHEL 9, the network can be configured through file-based settings by creating a SHOW CONTENTS
.nmconnection file in the /etc/NetworkManager/system-connections directory. After editing the configuration, set the file permissions to restrict access to the root user for security. Update the /etc/resolv.conf file to specify DNS servers. Once the configuration is complete, reload the NetworkManager connection profiles to apply the changes. If autoconnect is set to false, manually bring the connection up.
vim /etc/NetworkManager/system-connections/ens160-static.nmconnection: Open or create the network configuration file for editing.[connection]
id=ens160
uuid=62b7fd25-b5d9-3cae-8156-bc455c45b046
type=ethernet
autoconnect-priority=-999
interface-name=ens160-static
timestamp=1744708123
[ethernet]
[ipv4]
method=manual
address1=192.168.254.138/24
gateway=192.168.254.2
ignore-auto-dns=true
[ipv6]
addr-gen-mode=eui64
method=auto
[proxy]
chown root:root /etc/NetworkManager/system-connections/ens160-static.nmconnection: Set the file owner and group to root.chmod 600 /etc/NetworkManager/system-connections/ens160-static.nmconnection: Restrict permissions so only the root user can read and modify the file.vim /etc/resolv.conf: Edit the configuration file as below:
# Generated by NetworkManager
nameserver 8.8.8.8
nameserver 8.8.4.4
nmcli con reload: Reload NetworkManager connection profiles to apply changes.nmcli con up ens160-static: Bring the ens160-static connection up manually (required if autoconnect is disabled).
13. Archive & Transfer Files
Manage Compressed tar Files
An archive is a single file that stores multiple files and directories, often used for creating backups or simplifying file transfers across a network. On Linux, the tar utility is commonly used to create, manage, and extract archives. Below are some frequently used commands:SHOW CONTENTS
tar -cvf archive.tar file1 file2: Archives multiple files into a single uncompressed .tar file.tar -xvf archive.tar file1 file2 -C ./archives/: Extracts specific files from an uncompressed .tar archive to the ./archives/ directory.tar -czvf archive.tar.gz file1 file2: Creates a compressed .tar.gz archive from multiple files using gzip compression.tar -xzvf archive.tar.gz file1 file2 -C ./archives/: Extracts specific files from a .tar.gz compressed archive to the ./archives/ directory.tar -cjvf archive.tar.bz2 file1 file2: Creates a compressed .tar.bz2 archive using bzip2 compression.tar -xjvf archive.tar.bz2 file1 file2 -C ./archives/: Extracts specific files from a .tar.bz2 compressed archive to the ./archives/ directory.tar -cJvf archive.tar.xz file1 file2: Creates a compressed .tar.xz archive using xz compression.tar -xJvf archive.tar.xz file1 file2 -C ./archives/: Extracts specific files from a .tar.xz compressed archive to the ./archives/ directory.
Transfer Files Using sftp
To securely transfer files between systems, use the SHOW CONTENTS
sftp command. Below are some commonly used sftp commands:
sftp user_name@ip_address:/home/user_name/remote_file: Connect to the server and directly fetch a remote file to the local.sftp user_name@ip_address: Connect to the remote server via SFTP.help: Display a list of available SFTP commands.pwd: Show the current remote working directory.lpwd: Show the current local working directory.ls: List files in the remote directory.lls: List files in the local directory.cd: Change the remote directory.lcd: Change the local directory.put: Upload a file from local to remote.put -r: Recursively upload an entire directory.mput: Upload multiple files matching a pattern.get -r: Recursively download an entire remote directory.mget: Download multiple files matching a pattern.bye: Exit the SFTP session.
Synchronize File Using rsync
SHOW CONTENTS
rsync is a fast and versatile command-line tool for copying and synchronizing files locally and remotely. It only transfers the differences between source and destination, saving time and bandwidth. Below are some commonly used rsync commands:
rsync -avz source/ destination/: synchronize files/directories locally with compression and verbose output.rsync -avh /local/path/ /destination/path/: sync local directories with human-readable file sizes.rsync -avz /local/path/ user@remote:/remote/path/: upload files from local to remote server over SSH.rsync -avz user@remote:/remote/path/ /local/path/: download files from remote server to local machine.rsync -avz --delete /local/path/ user@remote:/remote/path/: sync local to remote and delete files on remote that don’t exist locally.rsync -avz -e ssh /local/path/ user@remote:/remote/path/: sync files over SSH, explicitly specifying the SSH protocol.
14. Install & Update Software Packages
Change Repository Mirror
By default, Red Hat Enterprise Linux (RHEL) 9 uses the official repository as its software source. To replace it with the Alibaba Cloud CentOS Stream mirror, follow these steps: Note: If the transaction test fails when running This allows the update process to complete for other packages while the conflict is handled separately.SHOW CONTENTS
redhat.repo file and disable the BaseOS and AppStream repositories by changing enabled=1 to enabled=0:
sudo vim /etc/yum.repos.d/redhat.repo
aliyun.repo and add the following configuration:
[AppStream]
name = Aliyun Centos Stream - AppStream
baseurl = https://mirrors.aliyun.com/centos-stream/9-stream/AppStream/x86_64/os/
enabled = 1
gpgcheck = 0

[BaseOS]
name = Aliyun Centos Stream - BaseOS
baseurl = http://mirrors.aliyun.com/centos-stream/9-stream/BaseOS/x86_64/os/
enabled = 1
gpgcheck = 0
sudo dnf clean all
sudo dnf makecache
sudo dnf update (for example, due to package conflicts), the issue can be temporarily avoided by excluding the conflicting packages:sudo dnf update --exclude=openssl*
Install & Update Software Packages with dnf
DNF (Dandified YUM) is the default package manager for RPM-based Linux distributions such as Fedora, CentOS, and RHEL. While DNF offers improved performance and new features over YUM, its commands are largely functionally identical. For backward compatibility, YUM commands still exist as symbolic links to DNF. Below are some basic The Transaction History refers to the record of package transactions, such as installations, removals, and updates. The DNF Modularity is a feature of the DNF package manager that enables users to install different versions of software packages within a single distribution. Key concepts of DNF Modularity includes Modules, Streams, and Profiles.SHOW CONTENTS
dnf commands:
dnf install <package>: Installs the specified package.dnf update: Updates all installed packages to their latest versions.dnf remove <package>: Removes the specified package from the system.dnf search <package>: Searches for a package by name or description.dnf list installed: Lists all installed packages on the system.dnf list <package>: Lists detailed information about the specified package.dnf info <package>: Provides detailed information about the specified package (e.g., version, repository, dependencies).dnf upgrade: Upgrades all installed packages to the latest versions, including kernel updates.dnf clean all: Cleans up the local repository cache to free up disk space.dnf makecache: Forces DNF to refresh and rebuild the metadata cache.
dnf command also has the concept of groups. A package group is a collection of related software packages that can be installed or removed together. Here are some common dnf group commands:
dnf group list: Lists all available package groups, including those that are installed and those that can be installed from repositories.dnf group list installed: Lists only the package groups that are currently installed on the system.dnf group info <group_name>: Displays detailed information about a specific package group, including the list of packages that belong to that group.dnf group install <group_name>: Installs all packages within a specified group, allowing you to easily install related software at once.dnf group remove <group_name>: Removes all packages in a specified group from the system.dnf group update <group_name>: Updates all the packages in the specified group to their latest available versions.dnf group upgrade <group_name>: Upgrades all the packages in the specified group, including dependencies and related packages.
dnf history command allows you to view past actions taken by DNF and revert to previous states when necessary. Below are some common dnf history commands:
dnf history: Lists all past transactions, showing details such as transaction ID, date, action (install, remove, update), and affected packages.dnf history info <transaction_id>: Displays detailed information about a specific transaction, including the packages that were installed, removed, or updated.dnf history undo <transaction_id>: Reverts the changes made in a specific transaction, such as undoing the installation or removal of packages.dnf history rollback <transaction_id>: Restores the system to the state it was in immediately after a specified transaction, undoing all changes made since that transaction.dnf history reset: Clears the transaction history, removing all past transaction records from the system.
python may have different streams for python3.6, python3.8, etc.dnf module commands:dnf module list: Lists all available modules and their streams.dnf module enable <module_name>: Enables a module, allowing the installation of its packages.dnf module disable <module_name>: Disables a module, preventing its packages from being installed.dnf module install <module_name>: Installs a module and its packages, using the default stream unless specified.dnf module info <module_name>: Shows detailed information about a module, including its streams and profiles.dnf module update <module_name>: Updates a module and its packages to the latest available versions.dnf module provides <package_name>: Displays which module provdies a specific package.
15. Access Linux File System
Disk Partition
A file system is a method of organizing and storing data on storage devices. It defines how data is stored, retrieved, and managed. To examine the file system on Linux, the Common file systems include ext4, NTFS, and XFS. To access the contents of a file system, it must be mounted to an empty directory, known as the mount point. Typically, the entire storage device is not formatted into a single file system; instead, it is divided into several partitions. Each partition is considered a block device in its own right. For example: To mount a file system manually, follow these steps: Here’s an example of device mounting: Note that file systems are automatically unmounted when the system shuts down or reboots. To ensure a file system is mounted at boot, edit the To unmount a device, ensure all processes related to it are terminated, then use the SHOW CONTENTS
df command provides an overview of disk space usage, while the du command offers detailed information about the disk usage of a specific file or directory. Here are some useful commands:
df -h: Displays disk space usage in a human-readable format.df -T: Displays the file system type along with disk space usage.du -h <directory_name>: Displays disk usage for a specific directory in a human-readable format.du -sh: Displays the total disk usage of the current directory in a human-readable format.du -sh <directory_name>: Displays the total disk usage for a specified directory in a human-readable format.
/dev/sda1./dev/sda2./dev/sdb2./dev/sdc3, and so on.
lsblk command to identify available block devices. (Use fdisk for partition manipulation when needed.)mkdir command.sudo mount <device_name> <mount_point> command to mount the file system.df command to verify the mount operation.
# 1. Use lsblk to get the block device name
lsblk

# 2. Create a mount point
mkdir /mnt/data

# 3. Mount the device
sudo mount /dev/sdb1 /mnt/data

# 4. Verify the mount operation
df -h
/etc/fstab file and add the following line:/dev/sdb1 /mnt/data ext4 defaults 0 0
umount command:umount /mnt/data
Locate File on the System
To locate a file on a Linux system, commonly used commands include The The The The SHOW CONTENTS
find, locate, which, and whereis.
find command searches for files in real time by parsing the file system hierarchy. Here are some commonly used find examples:
find /home -name "myfile.txt": Searches for a file named myfile.txt in the /home directory.find / -name "*.log": Searches for all .log files starting from the root directory.find / -iname "*message*": Searches for files that contain the word “message” (case-insensitive) in their names, starting from the root directory /.find /home -name "*.txt" -size +1M: Finds .txt files larger than 1MB in the /home directory.find /home -name "*.txt" -size -1G: Finds .txt files smaller than 1GB in the /home directory.
locate command searches a pre-generated index of file names and paths, making it much faster than find. However, it may not reflect recent changes in the file system until the index is updated. To update the database, use the updatedb command. Below are common locate examples:sudo updatedb # Updates the locate database
locate file.txt # Searches for the file "file.txt"
which command locates executables in the directories listed in the $PATH environment variable. It is useful for determining the location of a command or executable. For example:which python # Finds the path of the python executable
whereis command is used to locate the binary, source, and manual page files associated with a command. It is commonly used to search for documentation and related files. For example:whereis python # Finds binary, source, and man page for python
16. Schedule Future Tasks
Schedule a User Job
To schedule a deferred user job, the The For recurring tasks, use the SHOW CONTENTS
at command and the cron system can be used. The at command is suitable for one-time deferred tasks, while the cron system is better for recurring tasks.
at command schedules a one-time deferred task to run at a specific time in the future. To view pending jobs, use the atq command. When there is a need to cancel or remove a scheduled job, use the atrm command along with the job ID, which can be obtained from the atq command. Below is an example of using at command:echo "date >> ~/myjob.txt" | at now +1 minute
crontab command. Below is an example of scheduling a job to run every day at 3 AM:crontab -e
0 3 * * * date >> ~/myjob.txt # Schedule at 3 AM every day
Schedule a System Job
To schedule a system job, it is necessary to edit the Anacron is used for scheduling tasks that should run periodically but not necessarily at fixed times. It ensures that a missed job is executed as soon as possible after the system starts up. Below is an sample example: Systemd timers provide a more flexible way of scheduling tasks on Linux systems. They integrate with the systemd service manager, which makes them more powerful and capable of handling advanced scenarios. A systemd timer works by triggering a systemd service at specific intervals. It uses two components: Timer Unit and Service Unit. Below is an example:SHOW CONTENTS
/etc/crontab file or create a custom cron job file inside the /etc/cron.d/ directory. (Note that files in /etc/cron.d/ are not executable by default; to make them executable, run chmod +x file_name.) The shell scripts executed by these job entries are typically located in directories such as /etc/cron.hourly/, /etc/cron.daily/, etc. Below are some common examples of scheduling system jobs:# 1. Create a script named hourly_job.sh in /etc/cron.hourly/
sudo vim /etc/cron.hourly/hourly_job.sh
# 2. Add the following content to the script
#!/bin/bash
echo "Hourly job executed at $(date)" >> /var/log/hourly_job.log
# 3. Make the script executable
sudo chmod +x /etc/cron.hourly/hourly_job.sh
# period   delay   job-identifier   command
# 1        5       dailybackup      /usr/local/bin/backup.sh

# Run a daily backup at system start (5 minutes after boot)
1   5   dailybackup   /usr/local/bin/backup.sh
# 1. Create a service file
sudo vim /etc/systemd/system/myjob.service
# 2. Add the following content to the file
[Unit]
Description=Run my scheduled task

[Service]
Type=oneshot  # The service runs a one-time task
ExecStart=/usr/local/bin/myscript.sh  # Specifies the command to execute

# 3. Create a timer unit
sudo vim /etc/systemd/system/myjob.timer
# 4. Add the following content to the file
[Unit]
Description=Run my job every day at 3 AM

[Timer]
OnCalendar=daily  # Schedules the task to run once a day
Persistent=true  # Ensures that if the system is off during the scheduled time, the task will run once the system boots up.

[Install]
WantedBy=timers.target

# 5. Reload the systemd
sudo systemctl daemon-reload

# 6. Enable and start the timer
sudo systemctl enable myjob.timer
sudo systemctl start myjob.timer
Manage Temporary Files
SHOW CONTENTS
systemd-tmpfiles is a utility provided by systemd that allows for automatic management of temporary files and directories on Linux systems. It is primarily used to clean up temporary files, manage file permissions, and enforce file creation rules. systemd-tmpfiles works based on configuration files located in /etc/tmpfiles.d/, /usr/lib/tmpfiles.d/, and /run/tmpfiles.d/. Below is an example of automatic clean up:# 1. Create a configuration file
sudo vim /etc/tmpfiles.d/temp_cleanup.conf
# 2. Add the following content to the file
# Type Path Mode UID GID Age Argument
# Remove any .log files in /tmp that are older than 7 days.
f /tmp/*.log 0644 root root 7d -
# Remove empty directories in /tmp older than 7 days.
d /tmp/ 1777 root root 7d -
# 3. Create a system timer for automatic cleanup
sudo vim /etc/systemd/system/tmpfiles-cleanup.timer
# 4. Add the following content to the file
[Unit]
Description=Automatic cleanup of temporary files
[Timer]
# Run 1 hour after boot, then once every day
OnBootSec=1h
OnUnitActiveSec=1d
Unit=systemd-tmpfiles-clean.service
[Install]
WantedBy=timers.target
# 5. Create the service unit for systemd-tmpfiles cleanup
sudo vim /etc/systemd/system/systemd-tmpfiles-clean.service
# 6. Add the following content
[Unit]
Description=Cleanup temporary files using systemd-tmpfiles
[Service]
Type=oneshot
ExecStart=/usr/bin/systemd-tmpfiles --clean
# 7. Reload the systemd
sudo systemctl daemon-reload
# 8. Enable and start the timer
sudo systemctl enable tmpfiles-cleanup.timer
sudo systemctl start tmpfiles-cleanup.timer
17. Tune System Performance
Adjust Tuning Profiles
The The SHOW CONTENTS
tuned utility is used to statically and dynamically adjust a system’s configuration and optimize its performance based on different use cases, such as improving I/O performance, network throughput, and power saving.
dynamic_tuning variable in the /etc/tuned/tuned-main.conf configuration file. When enabled, tuned periodically monitors the system and adjusts the tuning settings according to the observed behavior. The frequency of updates can be controlled by modifying the update_interval variable in the same configuration file (in seconds between updates).
tuned utility provides several predefined profiles and allows for the creation of custom profiles to optimize a system’s behavior for specific workloads, such as servers, laptops, or high-performance environments. Below are some common commands for managing profiles:
tuned-adm active: Show the currently active profile.tuned-adm list: List all available profiles.tuned-adm profile_info: Show information about the active profile.tuned-adm profile_info <profile_name>: Show information about a specific profile.tuned-adm profile <profile_name>: Apply a specific tuning profile.tuned-adm recommend: Recommend an optimal profile based on the system’s current usage.tuned-adm off: Disable tuned and stop dynamic tuning.
Influence Process Scheduling
In Linux, process priorities determine the order in which processes are scheduled to run on the CPU. The scheduling policy and nice value are key factors in how the operating system manages process execution. Common scheduling policies include SCHED_NORMAL/SCHED_OTHER, SCHED_FIFO, and SCHED_RR. The nice value (default is To view the nice value of a running process, use the By default, when a process starts from the command line, it inherits its nice value from the shell process (default value is To adjust the nice value of an existing process, use the SHOW CONTENTS
0) is an integer that can range from -20 (highest priority, maps to a 0 in the top command) to +19 (lowest priority, maps to a 39 in the top command). It allows users to influence the priority of a process, where a lower nice value gives the process higher priority in CPU scheduling. A higher nice value lowers the priority. 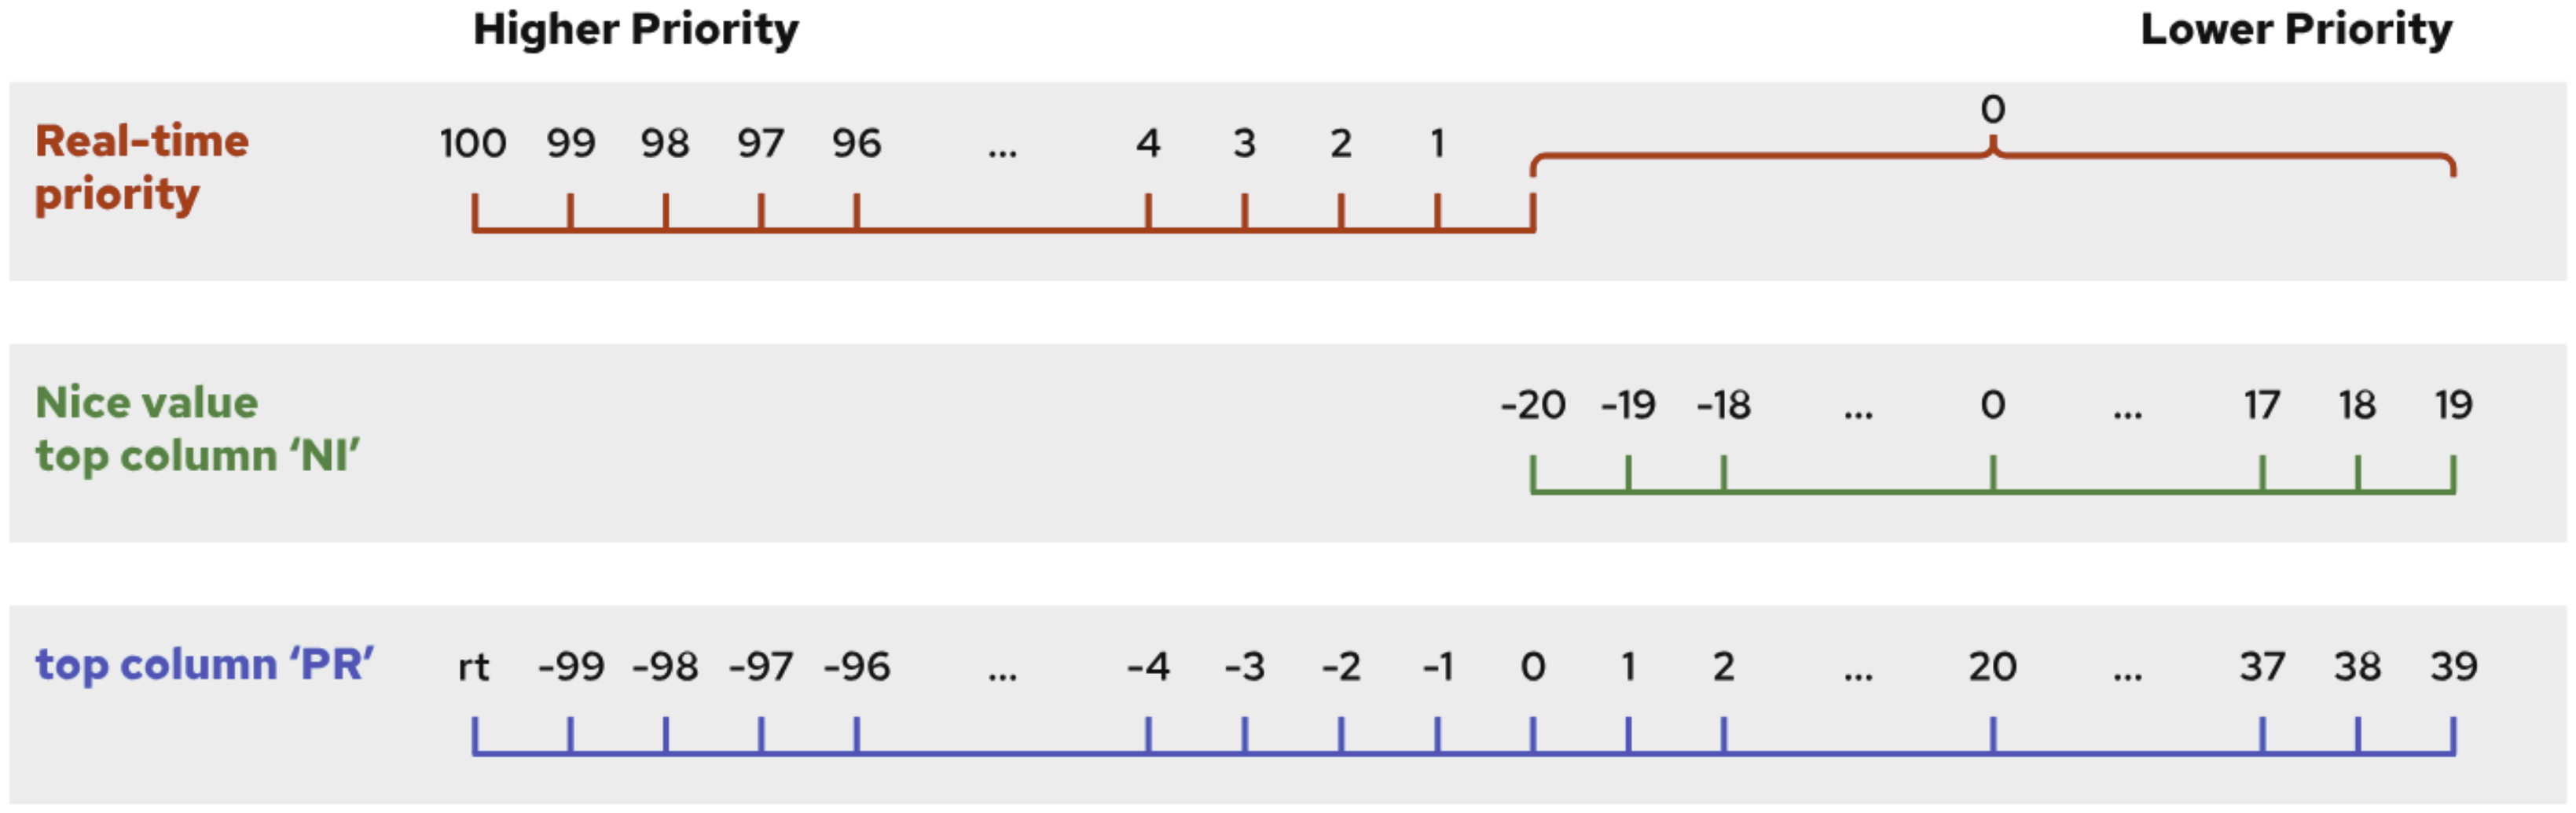
ps or top command. In top, the nice value is displayed under the NI column. Below is an example of using ps:ps -eo pid,comm,ni,cls --sort=-ni
0). To start a new process with a specific nice value, use the nice command. Here are some examples:nice sleep 60 & # Start a new process with the default nice value (0)
nice -n 15 sleep 60 & # Start a new process with a nice value of 15
renice command. The renice command allows users to change the nice value of a running process. Unprivileged users may only increase the nice value (lower the priority), up to a maximum of 19. Privileged users can both increase and decrease the nice value, with a minimum of -20. It is available to modify the nice value of a process from the interactive interface of top by pressing r, entering the process ID, and then specifying the new nice value. Below is an example of using renice:renice -n 18 1997 # Change the nice value of the process with PID 1997 to 18
18. Manage SELinux Security
Change the SELinux Environment Mode
SELinux (Security-Enhanced Linux) is a security module for the Linux kernel that provides a mechanism for enforcing access control security policies. It ensures resource access is controlled at a granular level. Unlike traditional file permissions, which control file access for specific users or groups, SELinux prevents even authorized users with access to a file from using it for unintended purposes. SELinux operates based on application-specific policies, such as the targeted policy, which precisely defines the allowed actions and access for each binary executable, configuration file, and data file used by an application. SELinux policies are security rules that define how specific processes can access files, directories, and ports. Each resource entity—such as a file, process, directory, or port—has a label called an SELinux context, which can be viewed using SELinux supports three operational modes: enforcing, permissive, and disabled. To change the SELinux mode, the SHOW CONTENTS
-Z option in many commands. Each SELinux context consists of four fields: user, role, type, and security level.
 For example, a web server process runs with the
 httpd_t type context. By default, files and directories in the /var/www/html/ directory have the httpd_sys_content_t type context A web server can access the httpd_sys_content_t labeled files, but has no rules to allow access to files for other services, such as mysqld_db_t labeled files.
selinux=0 kernel parameter at boot.)
setenforce command can be used, or the /etc/selinux/config file can be edited. It is recommended to reboot the system after making changes. To enable or disable SELinux, pass selinux=1 or selinux=0 respectively during system boot. Below are some examples of how to change the SELinux mode using commands:getenforce # Displays the current SELinux mode
setenforce enforcing # Sets SELinux to enforcing mode
setenforce 1 # Equivalent to setenforce enforcing
Control SELinux File Contexts
By default, SELinux labels files based on policies defined in the To change the SELinux context, three commands—SHOW CONTENTS
/etc/selinux/targeted/contexts/files/ directory. When creating a new file, it inherits the same label as its parent directory unless a specific label is applied. If a file is copied, its context will change, as copying a file creates a new inode. However, moving a file does not change its context, because moving a file only updates the inode’s filename without altering the inode itself. To preserve the context while copying, the -p or --preserved=context option can be used. For moving files, the -Z option is used to explicitly change the SELinux context. Below is an example:ls /tmp
# system_u:object_r:tmp_t:s0 /tmp
touch /tmp/file1 /tmp/file2 /tmp/file3
ls -Z /tmp/file*
# unconfined_u:object_r:user_tmp_t:s0 /tmp/file1
# unconfined_u:object_r:user_tmp_t:s0 /tmp/file2
# unconfined_u:object_r:user_tmp_t:s0 /tmp/file3
ls -Zd ~/
# unconfined_u:object_r:user_home_dir_t:s0 /home/signalyu999/
cp /tmp/file1 ~/
mv /tmp/file2 ~/
mv -Z /tmp/file3 ~/
ls -Z ~/file*
# unconfined_u:object_r:user_home_t:s0 /home/signalyu999/file1
# unconfined_u:object_r:user_tmp_t:s0 /home/signalyu999/file2
# unconfined_u:object_r:user_home_t:s0 /home/signalyu999/file3
semanage fcontext, restorecon, and chcon—are commonly used:
semanage fcontext: This command defines custom SELinux context rules for files or directories. It is often used to assign a specific context to files when they are created or moved to a particular location.restorecon: This command applies the SELinux context based on the rules defined by semanage fcontext. It restores the SELinux context of the file or directory to the predefined context.chcon: This command changes the SELinux context of a file or directory temporarily. Unlike semanage, which alters permanent rules, chcon applies the context change on a temporary basis and can be overwritten by restorecon.# Define a custom SELinux context for files in /home/signalyu999/test
sudo semanage fcontext -a -t tmp_t "/home/signalyu999/test(/.*)?"
mkdir ~/test
# Before applying
ls -Zd ~/test
# unconfined_u:object_r:user_home_t:s0 /home/signalyu999/test
cd test/
touch file1.txt
ls -Z file1.txt
# unconfined_u:object_r:user_home_t:s0 file1.txt
# Apply the custom SELinux context rule using restorecon
restorecon -v ~/test
# After applying
ls -Zd ~/test
# unconfined_u:object_r:tmp_t:s0 /home/signalyu999/test
ls -Zd file1.txt
unconfined_u:object_r:user_home_t:s0 file1.txt
touch file2.txt
ls -Z file2.txt
# unconfined_u:object_r:user_tmp_t:s0 file2.txt
# Temporarily change the SELinux context using chcon
sudo chcon -t user_home_t ~/test
ls -Zd ~/test
# unconfined_u:object_r:user_home_t:s0 /home/signalyu999/test
touch file3.txt
ls -Z file3.txt
# unconfined_u:object_r:user_home_t:s0 file3.txt
# Restore the original SELinux context with restorecon
restorecon -v ~/test
ls -Zd ~/test
# unconfined_u:object_r:tmp_t:s0 /home/signalyu999/test
ls -Z file*
# unconfined_u:object_r:user_home_t:s0 file1.txt
# unconfined_u:object_r:user_home_t:s0 file3.txt
# unconfined_u:object_r:user_tmp_t:s0 file2.txt
sudo semanage fcontext -l | grep "/home/signalyu999"
/home/signalyu999/test(/.*)? all files system_u:object_r:tmp_t:s0
restorecon -Rv ~/test
# Relabeled /home/signalyu999/test/file1.txt from unconfined_u:object_r:user_home_t:s0 to unconfined_u:object_r:tmp_t:s0
# Relabeled /home/signalyu999/test/file2.txt from unconfined_u:object_r:user_tmp_t:s0 to unconfined_u:object_r:tmp_t:s0
# Relabeled /home/signalyu999/test/file3.txt from unconfined_u:object_r:user_home_t:s0 to unconfined_u:object_r:tmp_t:s0
ls -Z file*
# unconfined_u:object_r:tmp_t:s0 file1.txt
# unconfined_u:object_r:tmp_t:s0 file3.txt
# unconfined_u:object_r:tmp_t:s0 file2.txt
rm -r ~/test
# Delete the custom context rule
sudo semanage fcontext -d "/home/signalyu999/test(/.*)?"
Adjust SELinux with Booleans
SELinux Booleans are runtime tunable parameters that control specific aspects of SELinux behavior. They allow administrators to enable or disable certain security features without altering the underlying SELinux policies. Some common SELinux booleans include: To manage SELinux booleans, the following commands are commonly used: SHOW CONTENTS
httpd_can_network_connect: Enable it to allow Apache to access external resources over the network.httpd_enable_homedirs: Enable it to allow Apache to serve content from user home directories.allow_execmem: Enable it to allow executable memory mapping.selinuxuser_execheap: Enable it to allow SELinux users to execute files with low-security contexts.samba_enable_home_dirs: Enable it to allow Samba to share user home directories.
getsebool, setsebool, and semanage boolean. Below is an example of how to check and change SELinux boolean values:# List all SELinux booleans related to "httpd_enable_"
getsebool -a | grep "httpd_enable_"
# httpd_enable_cgi --> on
# httpd_enable_ftp_server --> off
# httpd_enable_homedirs --> off
# Check the current state of a specific boolean
getsebool httpd_enable_homedirs
# httpd_enable_homedirs --> off
# Use semanage to view the details of a specific boolean
sudo semanage boolean -l | grep httpd_enable_homedirs
# httpd_enable_homedirs (off, off) Allow httpd to enable homedirs
# Change the value of a boolean (without the -P flag, the changes will only persist until the system is rebooted)
sudo setsebool httpd_enable_homedirs on
# Use semanage again to confirm the change
sudo semanage boolean -l | grep httpd_enable_homedirs
# httpd_enable_homedirs (on, off) Allow httpd to enable homedirs
# Make the change persistent across reboots
sudo setsebool -P httpd_enable_homedirs on
# Check the persistent state of all SELinux booleans
sudo semanage boolean -l -C
# SELinux boolean State Default Description
# httpd_enable_homedirs (on, on) Allow httpd to enable homedirs
# ...
sudo setsebool -P httpd_enable_homedirs off
Investigate and Resolve SELinux Issues
When SELinux denies an action, it logs an AVC (Access Vector Cache) message to the If a boolean needs to be modified, for example, enabling Apache to read user content, use the If the context is incorrect, it can be fixed using the Below is a simple example:SHOW CONTENTS
/var/log/audit/audit.log file. Additionally, a summary of the AVC event is sent to /var/log/messages. These logs provide valuable information to diagnose SELinux-related issues. Here are some common steps to troubleshoot SELinux issues:
sudo grep AVC /var/log/audit/audit.log | audit2why
getsebool -a | grep httpd
setsebool command with the -P option to make the change persistent:sudo setsebool -P httpd_read_user_content 1
ls -Z /path/to/file
semanage fcontext command to define the correct context or restorecon to apply the default context based on the current policies:sudo restorecon -v /path/to/file
sudo systemctl start httpd

echo "<h1>HELLO</h1>" >> ~/index.html

sudo mv ~/index.html /var/www/html/

curl http://localhost/index.html
# <!DOCTYPE HTML PUBLIC "-//IETF//DTD HTML 2.0//EN">
# <html><head>
# <title>404 Not Found</title>
# </head><body>
# <h1>Not Found</h1>
# <p>The requested URL was not found on this server.</p>
# </body></html>

# Check the SELinux audit logs for AVC denials related to the "httpd" process
sudo grep AVC /var/log/audit/audit.log | audit2why
# type=AVC msg=audit(1746191992.345:5086): avc:  denied  { read } for  pid=84172 comm="httpd" name="index.html" dev="dm-0" ino=34324608 scontext=system_u:system_r:httpd_t:s0 tcontext=unconfined_u:object_r:user_home_t:s0 tclass=file permissive=0

# Was caused by:
# The boolean httpd_read_user_content was set incorrectly.
# Description:
# Allow httpd to read user content

# Allow access by executing:
# # setsebool -P httpd_read_user_content 1

sudo setsebool -P httpd_read_user_content 1
curl http://localhost/index.html
# <h1>HELLO</h1>
19. Manage Basic Storage
Add Partitions, File Systems, and Persistent Mounts
Disk partitioning is the process of dividing a computer’s storage device into separate, independent sections called partitions. Each partition acts like an individual disk, allowing it to be formatted with a specific file system and used for various purposes, such as system files, user data, or backups. There are two main disk partitioning schemes: MBR (Master Boot Record) and GPT (GUID Partition Table). MBR (Master Boot Record): MBR is an older partitioning scheme that is commonly used in BIOS-based systems. It stores partitioning information in the first sector of the disk, known as the master boot record. This sector contains both the bootloader (a small program that helps the system load the operating system) and the partition table, which holds the details about each partition. MBR supports a maximum of four primary partitions and is limited to disks up to 2 TB in size. GPT (GUID Partition Table): GPT is a newer partitioning scheme designed as part of the UEFI (Unified Extensible Firmware Interface) standard. GPT overcomes the limitations of MBR by using two partition tables: a primary GPT header located at the beginning of the disk and a backup GPT header stored at the end of the disk. This redundancy ensures protection in case the primary GPT header is damaged. GPT supports up to 128 partitions by default and can handle disks as large as 9.4 ZB. Below is an real-world example of disk partitioning: Below is a real-world example of removing a partition:SHOW CONTENTS


# 1. Shutdown the VMware machine and add the new disk device.

# 2. Use parted to manage the partitions on /dev/sdb (the new disk).
sudo parted /dev/sdb

# 3. Create a new partition table (GPT or MSDOS). GPT is recommended for modern systems.
(parted) mklabel gpt  # Or use "msdos" for older systems.

# 4. Create a new primary partition
(parted) mkpart
# partition name: app-data
# file system type: ext4
# start: 0%
# end: 50%

# 5. Print the partition information to verify the partition layout.
(parted) print

# 6. Ensure the system create the associated device file in the /dev directory
udevadm settle

# 7. Format the partition
sudo mkfs.ext4 /dev/sdb1

# 8. Create a mounting point and mount the newly created partition
sudo mkdir /mnt/mydata
sudo mount /dev/sdb1 /mnt/mydata

# 9. Use blkid to get the UUID of the new partition.
sudo blkid /dev/sdb1
# /dev/sdb1: UUID="98c3694b-5a44-4729-bc14-2987562754cd" TYPE="ext4" PARTLABEL="app-data" PARTUUID="4c737002-504a-4206-adda-737270fc083e"

# 10. Edit the /etc/fstab
sudo vim /etc/fstab
# UUID=98c3694b-5a44-4729-bc14-2987562754cd /mnt/mydata ext4 defaults 0 2
# UUID: Universally Unique Identifier
# defaults: include auto mount option
# /mnt/mydata: mounting point
# ext4: file system
# 0: dump (back up option), 0 = no backup (default), 1 = enable backup
# 0: fsck (file system checking), 0 = do not check, 1 = check first (usually for root), 2 = check after root (for other file systems)

# 11. After editing /etc/fstab, mount all filesystems as specified in /etc/fstab.
sudo mount -a

# 12. Use the df command to check that the partition is correctly mounted.
df -h

# 13. Register new configuraation
sudo systemctl daemon-reload
# 1. Ensure the partition is not mounted
sudo umount /dev/sdb1

# 2. Check if it is mounted
df -h

# 3. Delete the partition in parted
parted /dev/sdb
(parted) print
(parted) rm 1

# 4. Edit the /etc/fstab file
Manage Swap Space
Swap space is a portion of the disk that is used as virtual memory when the system’s physical RAM is full. It allows the operating system to move inactive pages from RAM to disk, free up memory for active processes. When creating swap partitions, administrators should size the swap space based on the memory workload on the system. Below is a practical guide line: Below is an real-world example of creating swap partition: Below is a real-world example of removing a swap partition:SHOW CONTENTS
RAM Size
Swap (No Hibernation)
Swap (With Hibernation)
< 2 GB
Twice the RAM
Three times the RAM
2–8 GB
Same as RAM
Twice the RAM
8–64 GB
At least 4 GB
1.5 times the RAM
> 64 GB
At least 4 GB
Hibernation is not recommended
# 1. Open parted to manage the new disk
parted /dev/sdc

# 2. Create a GPT partition table
(parted) mklabel gpt

# 3. Create a new partition
(parted) mkpart
# partition name: swap1
# file system type: linux-swap
# start: 0%
# end: 100%

# 4. Ensure the system create the associated device file in the /dev directory
udevadm settle

# 5. Format the new partition as swap space
mkswap /dev/sdc1

# 6. Activate the swap space immediately
swapon /dev/sdc1

# 7. Get the UUID of the swap partition
blkid /dev/sdc1
# /dev/sdc1: UUID="e2d9fbc3-65dc-4427-8051-c07dcc043866" TYPE="swap" PARTLABEL="swap1" PARTUUID="4f0f1298-cf05-4440-856f-534d69aeeccc"

# 8. Edit fstab to enable swap at boot
sudo vim /etc/fstab
# UUID=e2d9fbc3-65dc-4427-8051-c07dcc043866 none swap defaults 0 0
# Add the following line for default swap:
# UUID=e2d9fbc3-65dc-4427-8051-c07dcc043866 none swap defaults 0 0
# Or set a custom priority:
# UUID=e2d9fbc3-65dc-4427-8051-c07dcc043866 none swap pri=10 0 0

# 9. Reload systemd config (optional if fstab changed)
sudo systemctl daemon-reload

# 10. Display swap space priorities
swapon --show
# 1. Turn off swap
sudo swapoff /dev/sdc1

# 2. Verify whether a swap is off
swapon --summary

# 3. Remove the partition in parted
parted /dev/sdc1
(parted) print
(parted) rm [number]

# 4. Edit the /etc/fstab file
20. Manage Storage Stack
Create and Extend Logical Volumes
Logical Volume Manager (LVM) is a system for managing disk storage in Linux that adds a layer of abstraction between physical storage devices and file systems. It allows multiple physical volumes to be combined into a single volume group, enabling more flexible and efficient storage allocation. The key components of LVM include: Physical Devices (PD), Physical Volumes (PV), Volume Groups (VG), and Logical Volumes (LV). Creating a logical volume involves creating physical device partitions, physical volumes, and volume groups. Below is an example: Below is an example of removing logical volumes, volume groups, and physical volumes: Here are some commonly used command of LVM:SHOW CONTENTS
/dev/sda, /dev/sdb).pvcreate.vgcreate.lvcreate.
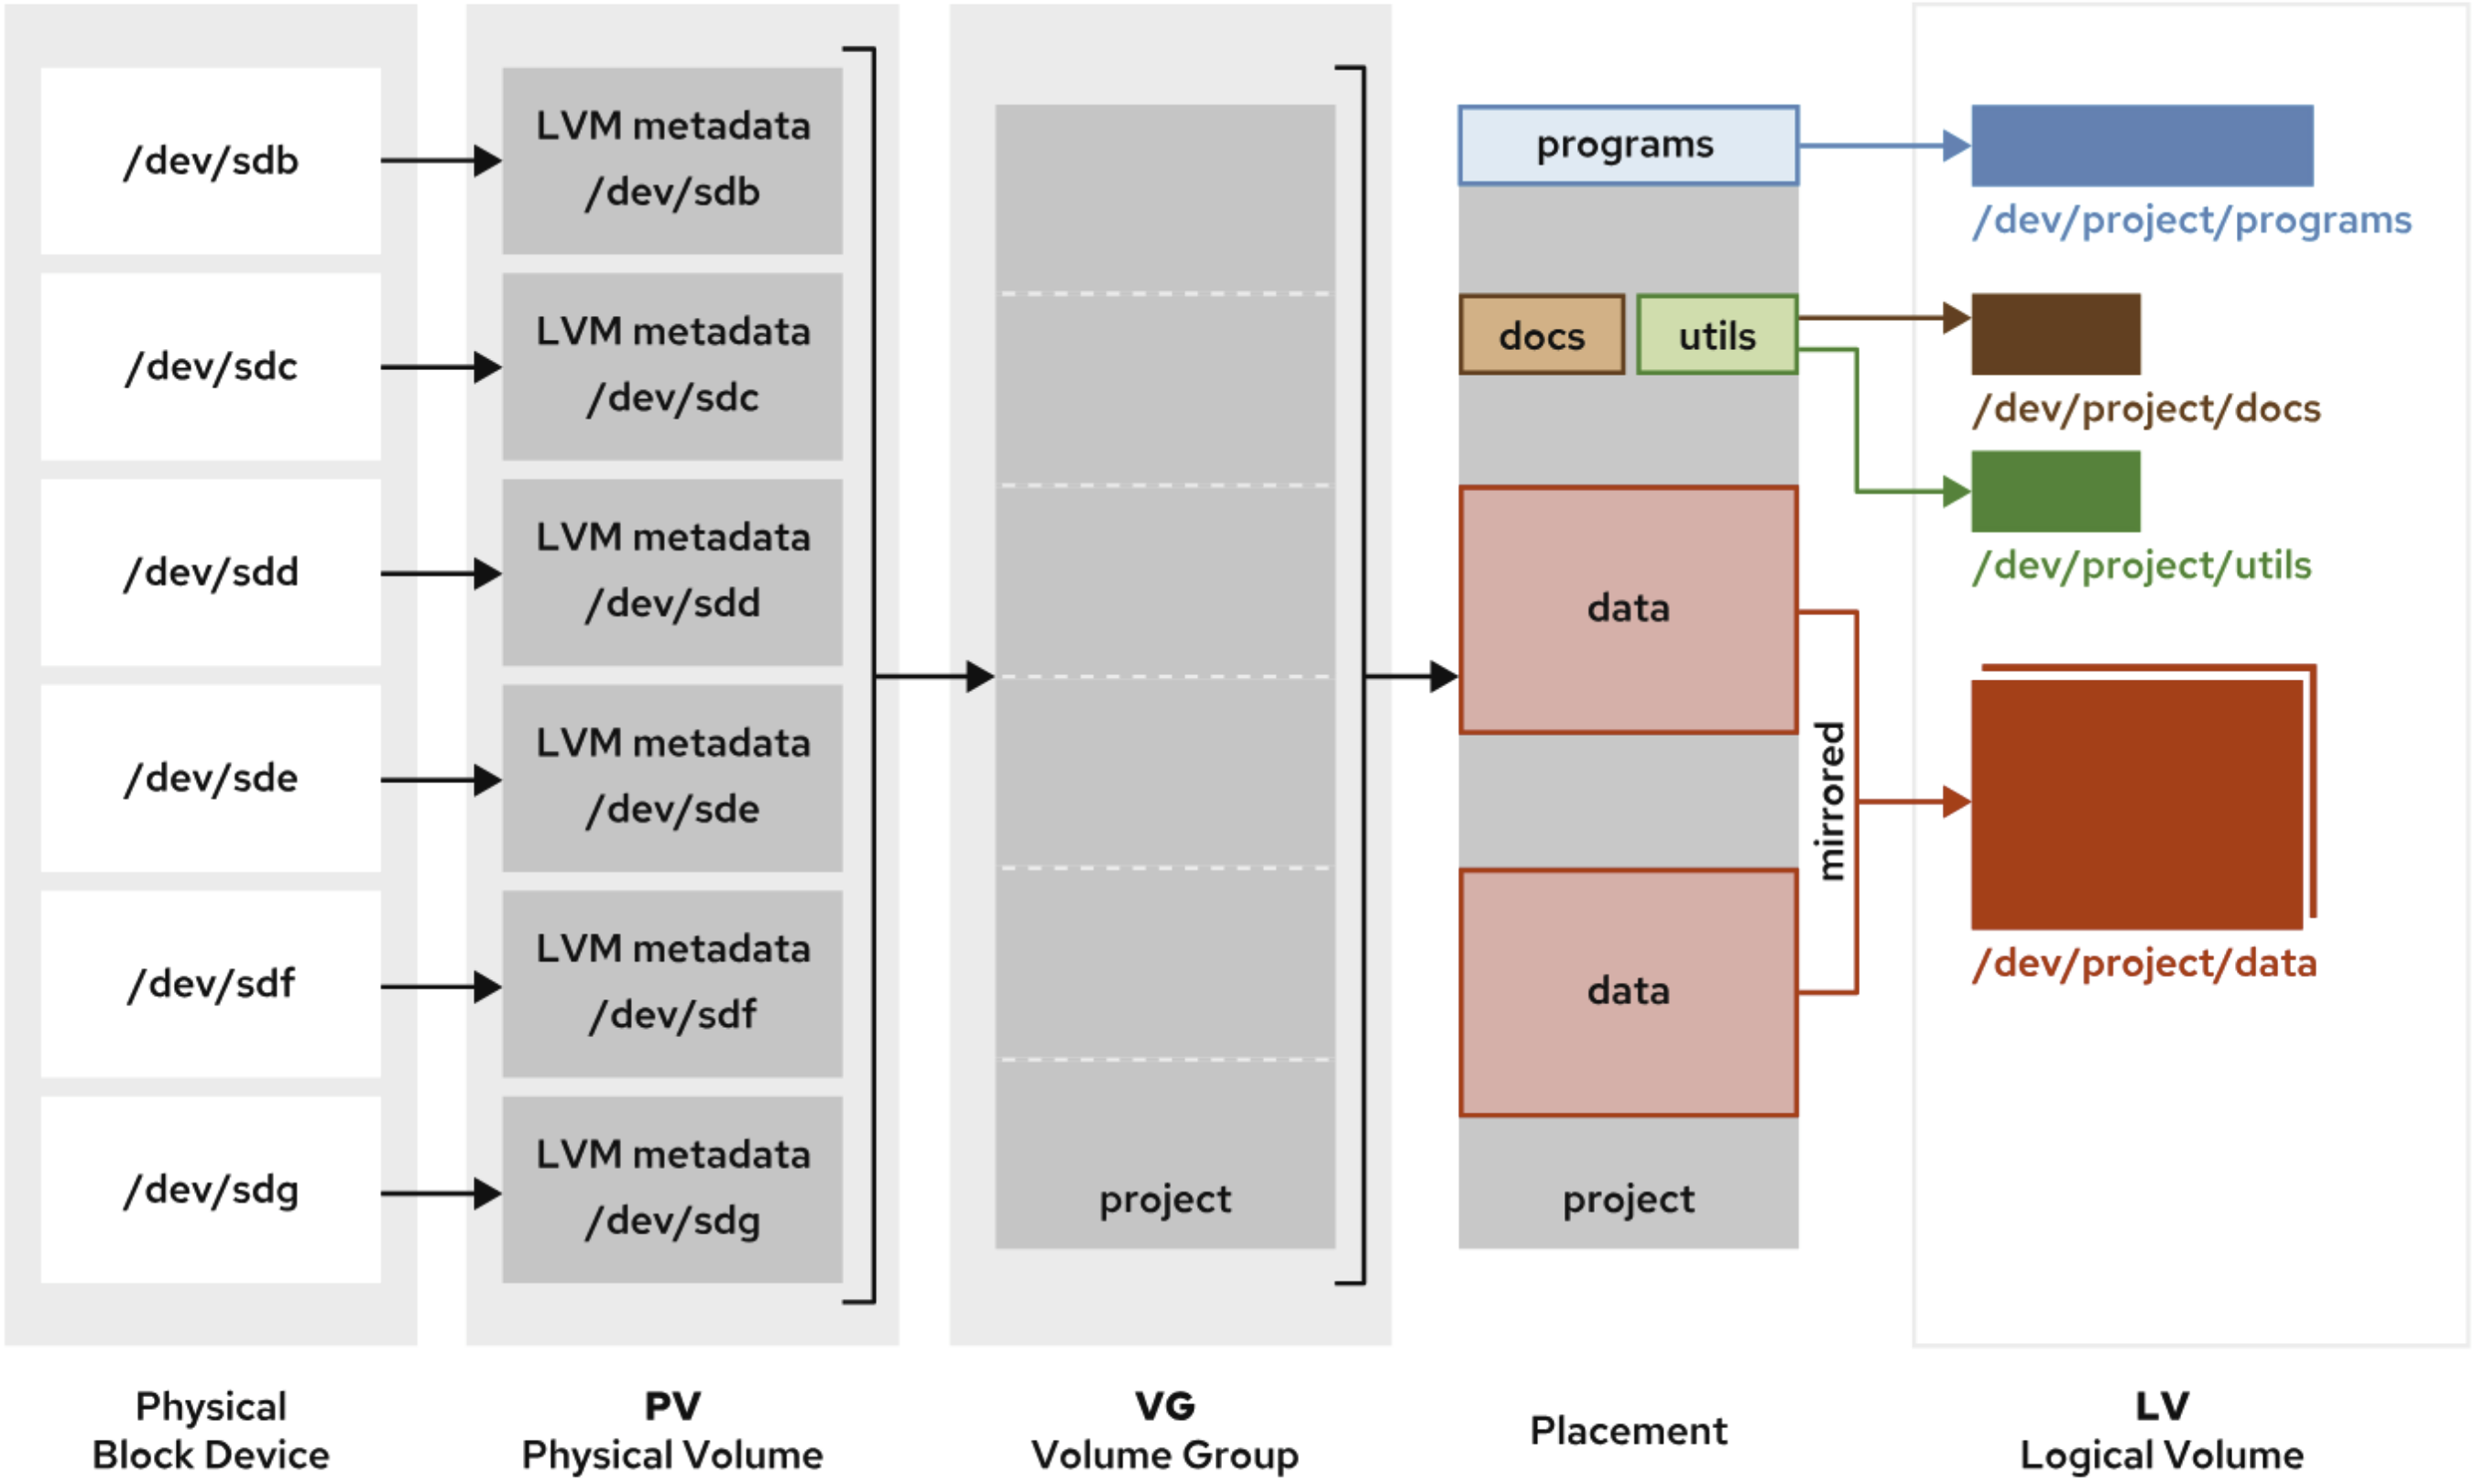
# 1. Prepare physical devices
parted /dev/sdb
(parted) mklabel gpt
(parted) mkpart primary 1MiB 50%
(parted) set 1 lvm on
parted /dev/sdc
(parted) mklabel gpt
(parted) mkpart primary 50% 100%
(parted) set 1 lvm on
udevadm settle

# 2. Create Physical volumes
pvcreate /dev/sdb1 /dev/sdc1
# Physical volume "/dev/sdb1" successfully created.
# Physical volume "/dev/sdc1" successfully created.

# 3. Create volume groups
vgcreate vg01 /dev/sdb1 /dev/sdc1
# Volume group "vg01" successfully created

# 4. Create a logical volume
lvcreate -n lv01 -L 100G vg01
# Logical volume "lv01" created.

# 5. Format the logical volume
mkfs.ext4 /dev/vg01/lv01

# 6. Edit the /etc/fstab file
blkid /dev/vg01/lv01
# /dev/vg01/lv01: UUID="87a466b5-4b94-4881-8398-4ec3f91544f1" TYPE="ext4"
vim /etc/fstab
# UUID=87a466b5-4b94-4881-8398-4ec3f91544f1 /mnt/app-data ext4 defaults 0 0

# 7. Mount the logical volume to /mnt/app-data
mount /dev/vg01/lv01 /mnt/app-data

# 7. Verify whether if the logical volume is mounted
df -h
# 1. Unmount the file system and remove any /etc/fstab entries associated with it
umount /mnt/app-data
vim /etc/fstab
# Remove any entries with the file system

# 2. Back up the data before removing
cp -r /mnt/app-data ~/backup/volume-data

# 3. Remove the logical volume
lvremove /dev/vg01/lv01

# 4. Remove the volume group
vgremove vg01

# 5. Remove the physical volumes
pvremove /dev/sdb1 /dev/sdc1
pvdisplay /dev/sdb1: Displays detailed information about the physical volume /dev/sdb1.vgdisplay vg01: Shows information about the volume group vg01.lvdisplay /dev/vg01/lv01: Displays details of the logical volume lv01 under volume group vg01.# Prepare the physical device
parted /dev/sdb
(parted) mklabel gpt # Set GPT partition table
(parted) mkpart primary 50% 100% # Create partition in the second half of the disk
(parted) set 3 lvm on # Mark it as an LVM partition
udevadm settle # Wait for partition events to settle
pvcreate /dev/sdb3 # Initialize as a physical volume
vgextend vg01 /dev/sdb3 # Extend volume group vg01 with the new PV
lvextend -L +500M /dev/vg01/lv01  # Increase LV size by 500MB
xfs_growfs /mnt/app-data/  # For XFS file system (online grow only)
resize2fs /dev/vg01/lv01  # For ext2/3/4 file systems (supports online/offline grow/shrink)
swapoff -v /dev/vg01/swap  # Disable swap before resizing
lvextend -L +300M /dev/vg01/swap  # Extend swap by 300MB
mkswap /dev/vg01/swap  # Reformat as swap
swapon /dev/vg01/swap  # Re-enable swap
Manage Layered Storage
SHOW CONTENTS