Introduction to Docker
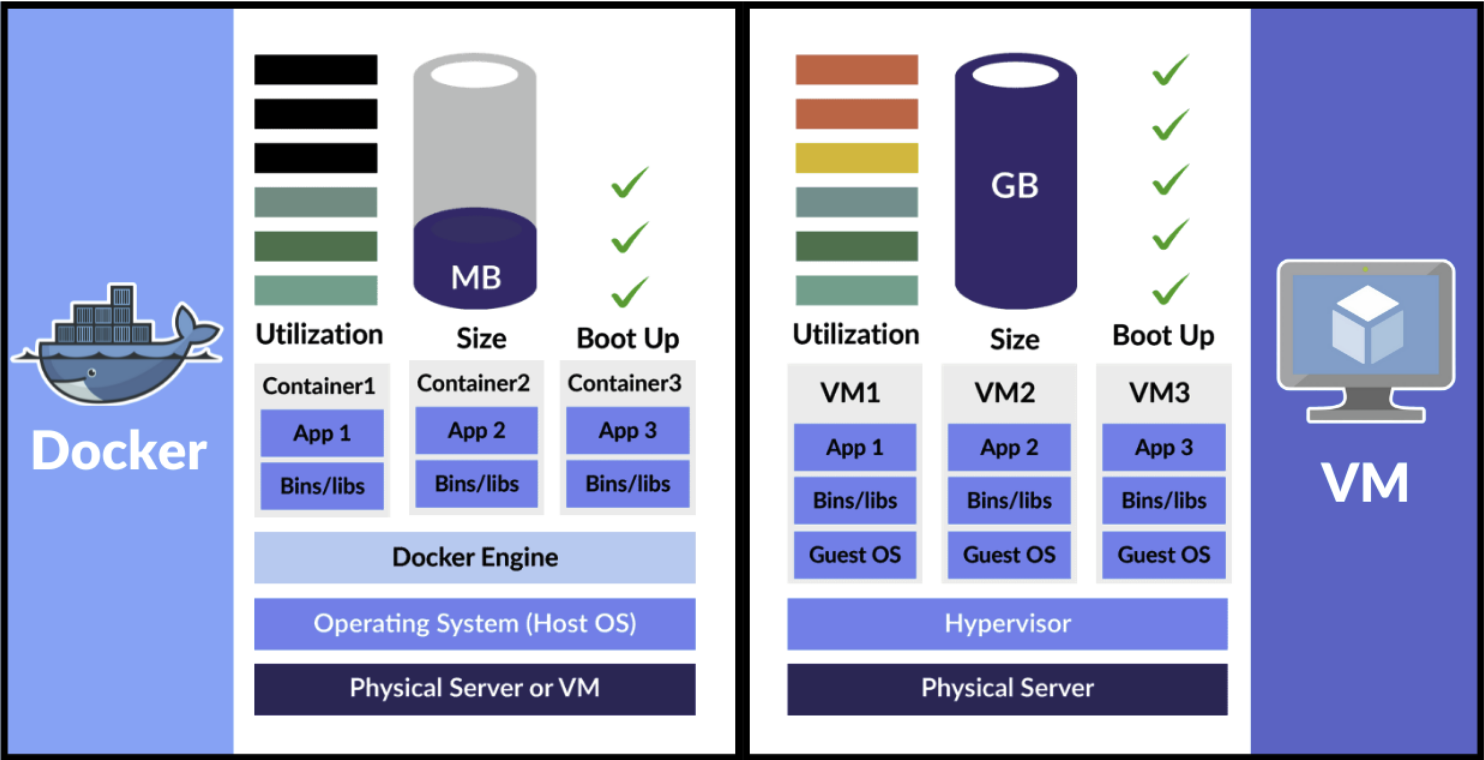
Docker was developed to address the challenges of software deployment across various environments by providing a lightweight, consistent, and portable solution. Prior to Docker, developers often faced issues like “it works on my machine, but not in production,” caused by inconsistencies in dependencies, libraries, and configurations. Docker resolves this by containerizing applications, ensuring they run uniformly across any infrastructure. Its primary goal is to simplify development, testing, and deployment by encapsulating applications and their dependencies into isolated, reproducible containers. These containers are user-space instances that package code, runtime, system tools, and libraries, ensuring consistency across environments. The key difference between Docker and Virtual Machines (VMs) lies in their architecture. VMs emulate entire hardware stacks, requiring a full operating system for each instance, which results in significant overhead. In contrast, Docker uses containers that share the host OS kernel, offering a more lightweight and efficient solution by isolating applications at the process level. Docker has three core components: images, containers, and registries. Images are read-only templates that contain application code and dependencies. Containers are runnable instances of these images; they are isolated, lightweight, and ephemeral. Registries are repositories that store and share Docker images.
SHOW CONTENTS
Docker Architecture
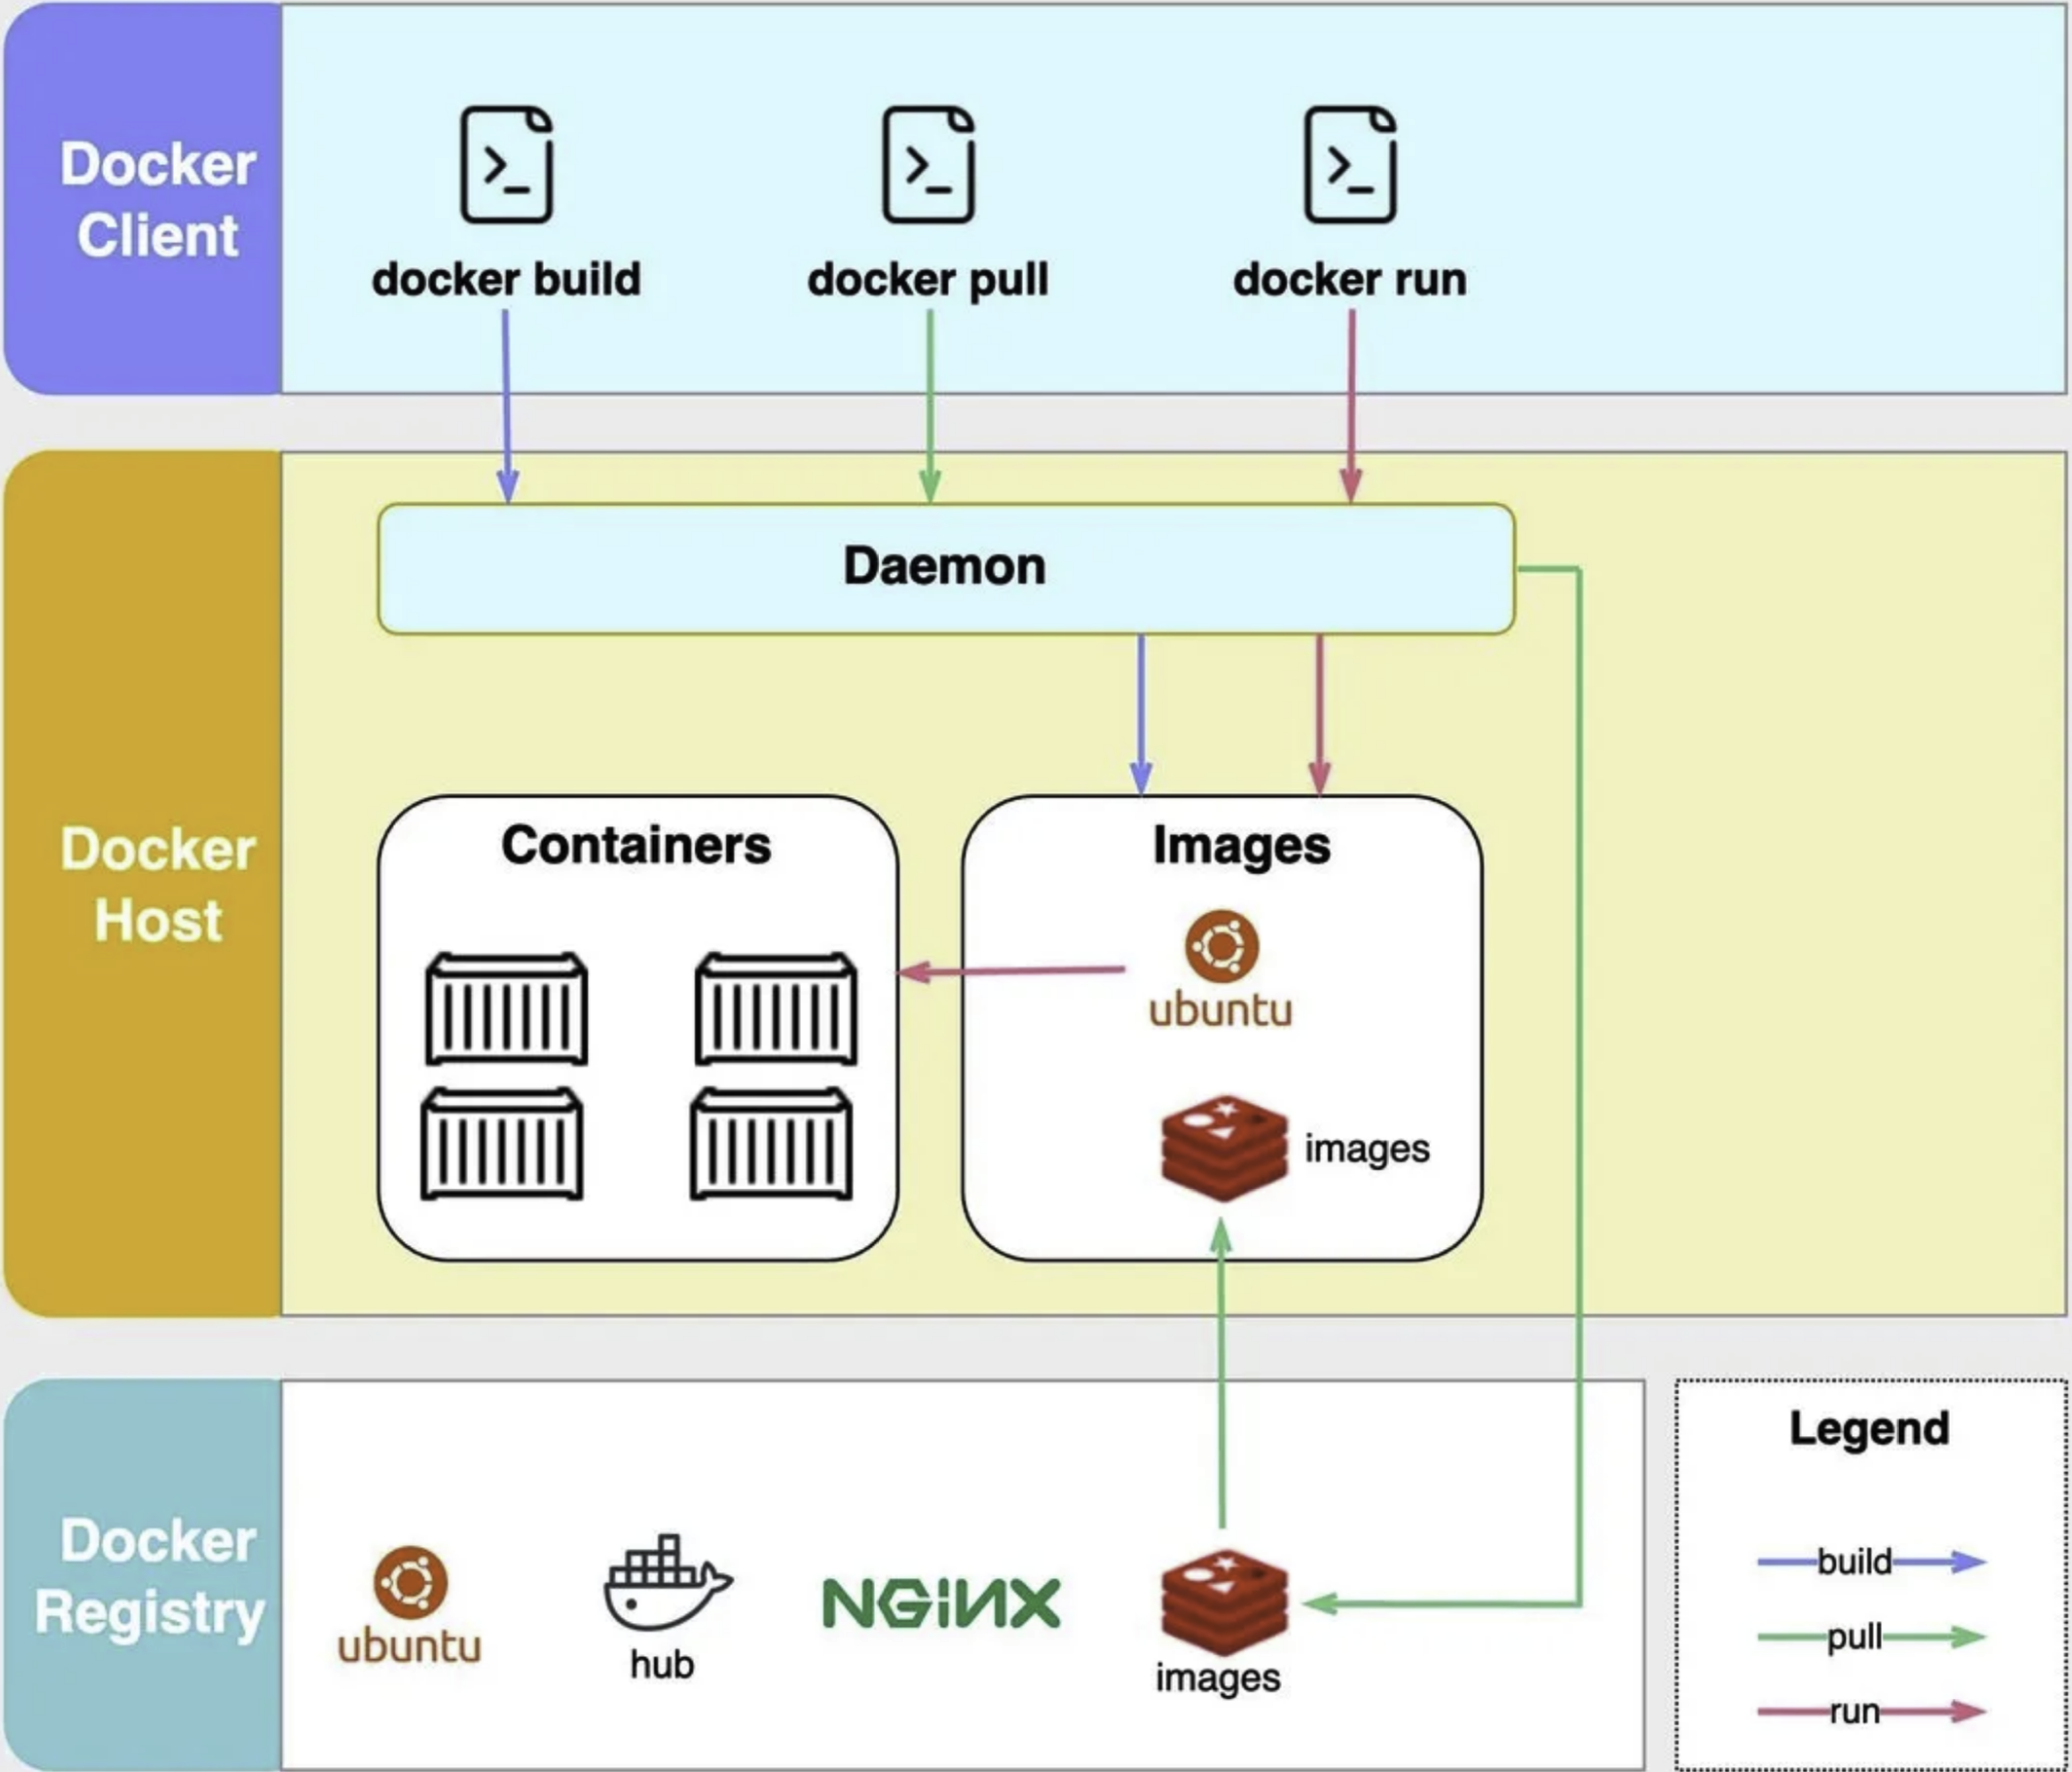
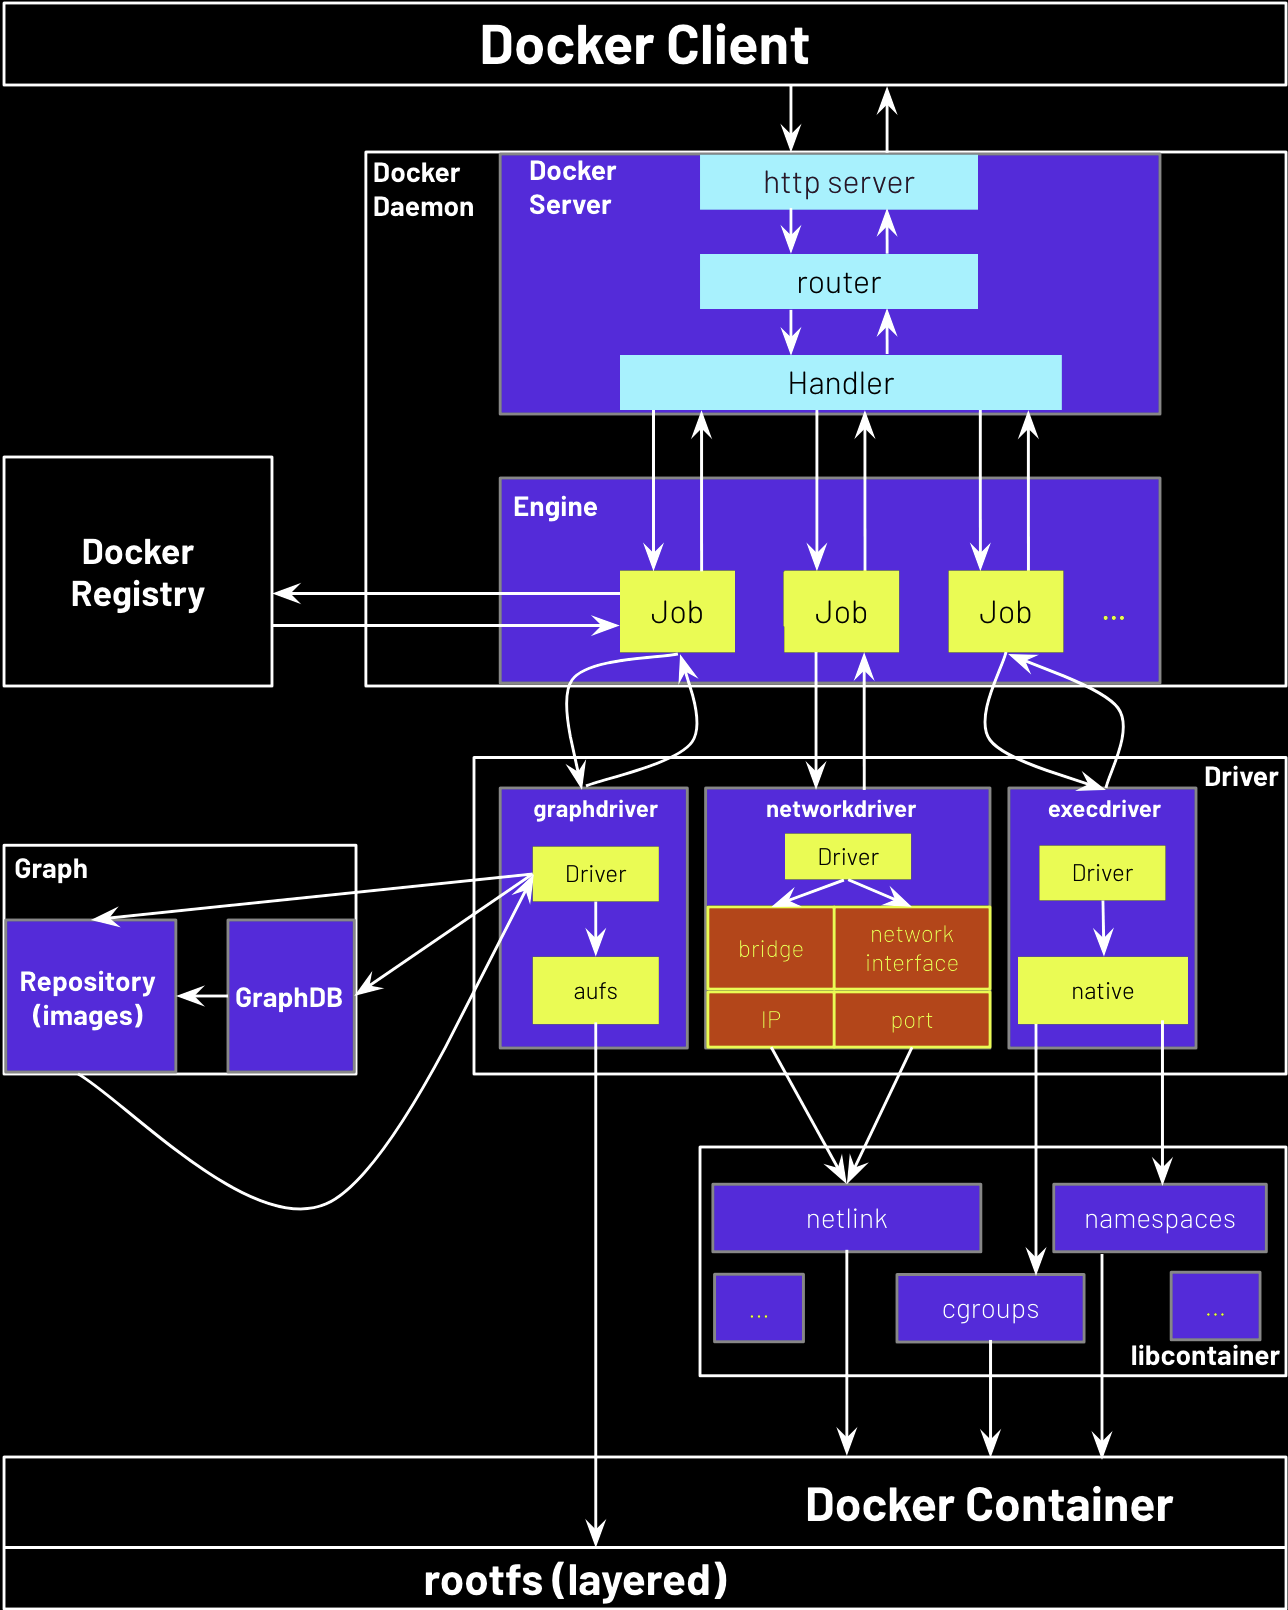
Docker follows a Client/Server (C/S) architecture with a loosely coupled backend where various components perform specific functions. The basic workflow of Docker is as follows:
SHOW CONTENTS
Common Docker Commands
Basic Commands
SHOW CONTENTS
sudo systemctl start docker
sudo systemctl stop docker
sudo systemctl restart docker
sudo systemctl status docker
docker info
docker --help
docker -v
Docker Image Commands
SHOW CONTENTS
docker search <image_name>
docker search nginxdocker pull <image_name>
docker pull nginxdocker images
docker image lsdocker inspect <image_name_or_id>
docker inspect nginxdocker tag <image_id_or_name> <new_image_name>:<new_tag>
docker tag nginx:latest nginx:1.27.4docker rmi <image_name_or_id>
docker rmi nignx:1.27.4docker build -t <image_name>:<tag> <path_to_dockerfile>
docker build -t myapp:latest .docker save -o <output_file_name>.tar <image_name>:<tag>
docker save -o myapp.tar myapp:latestdocker load -i <file_name>.tar
docker load -i myapp.tardocker image prune
docker image prune -a
Docker Container Commands
SHOW CONTENTS
docker run: Create and start a new container
docker run -it -p 8080:8080 --name tomcat9 tomcat:9-jre17 /bin/bash: Start a new container from the tomcat:9-jre17 image, name it tomcat9, map port 8080 inside the container to port 8080 on the host, and open an interactive bash shell inside the container.docker ps: List all currently running containers
docker ps: List containers that are currently running.docker ps -a: List all containers.docker start <container_id_or_name>: Start a stopped container
docker start my_container: Start a container with the name my_container.docker restart <container_id_or_name>: Restart a container
docker restart my_container: Restart the container named my_container.docker stop <container_id_or_name>: Stop a running container
docker stop my_container: Stop the container named my_container.docker kill <container_id_or_name>: Force stop a running container
docker kill my_container: Force stop the container named my_container.docker rm <container_id_or_name>: Remove a stopped container
docker rm my_container: Remove the container named my_container after it has stopped.docker run -d <container_id_or_name>: Start a container in detached mode (background)
docker run -d nginx: Run the Nginx container in the background.docker logs <container_id_or_name>: View logs of a container
docker logs my_container: View logs for the container named my_container.docker top <container_id_or_name>: View the running processes inside a container
docker top my_container: Display the processes running inside my_container.docker inspect <container_id_or_name>: Get detailed information about a container
docker inspect my_container: Show detailed metadata about the container named my_container.docker exec -it <container_id_or_name> <command>: Execute a command inside a running container (interactive mode)
docker exec -it my_container bash: Open an interactive bash shell inside my_container.exit: Exit from an interactive session inside a container
exit: Exit the interactive shell of the container and return to the host.docker cp <container_id_or_name>:<path_in_container> <path_on_host>: Copy files from a container to the host
docker cp my_container:/app/file.txt /host/directory/: Copy file.txt from the container to the host.
Docker Images
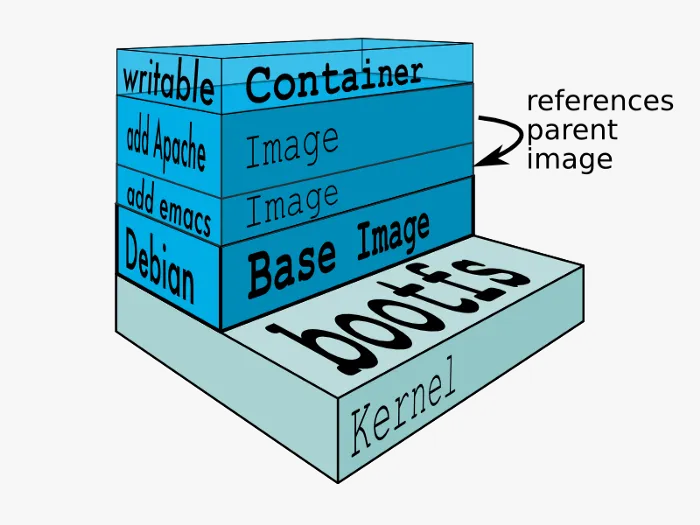
A Docker image is a read-only template used to create containers. It is composed of several layers stacked on top of each other, with each layer representing a snapshot of the filesystem at a specific point in time. These snapshots capture modifications made by Docker instructions (such as installing a package, copying files, or modifying configurations). Layers are created during the execution of commands in a Dockerfile or when using a pre-existing image to build a new one. Docker leverages UnionFS to efficiently manage these layers, allowing it to present a unified view of the container’s filesystem. This approach helps optimize storage and performance, as common layers can be shared across different images. Here is a simple example of creating an image using a Dockerfile: Docker provides the SHOW CONTENTS
FROM ubuntu  # This layer contains the base Ubuntu image
RUN apt-get update  # This layer contains the updated package list
COPY . /app  # This layer contains the application files copied into /app
CMD ["python", "/app/app.py"]  # This layer contains the command to run the application when the container starts
docker commit command, which allows creating a new image based on the changes made to a running container. It is similar to taking a snapshot of the container’s current state. Below is a real-world example:# Run a container from a base image
docker run -it ubuntu /bin/bash
# Make changes inside the container
apt-get update
apt-get install -y vim
# Commit the container to create a new image
docker commit <container_id> my-ubuntu-image
Docker Volumes
A Docker volume is a persistent storage mechanism designed to store data outside of a container’s filesystem. Volumes are stored on the host machine and can be shared and reused across multiple containers. They are particularly useful for overcoming the ephemeral nature of container filesystems, ensuring that data persists even when containers are stopped, removed, or replaced.
SHOW CONTENTS
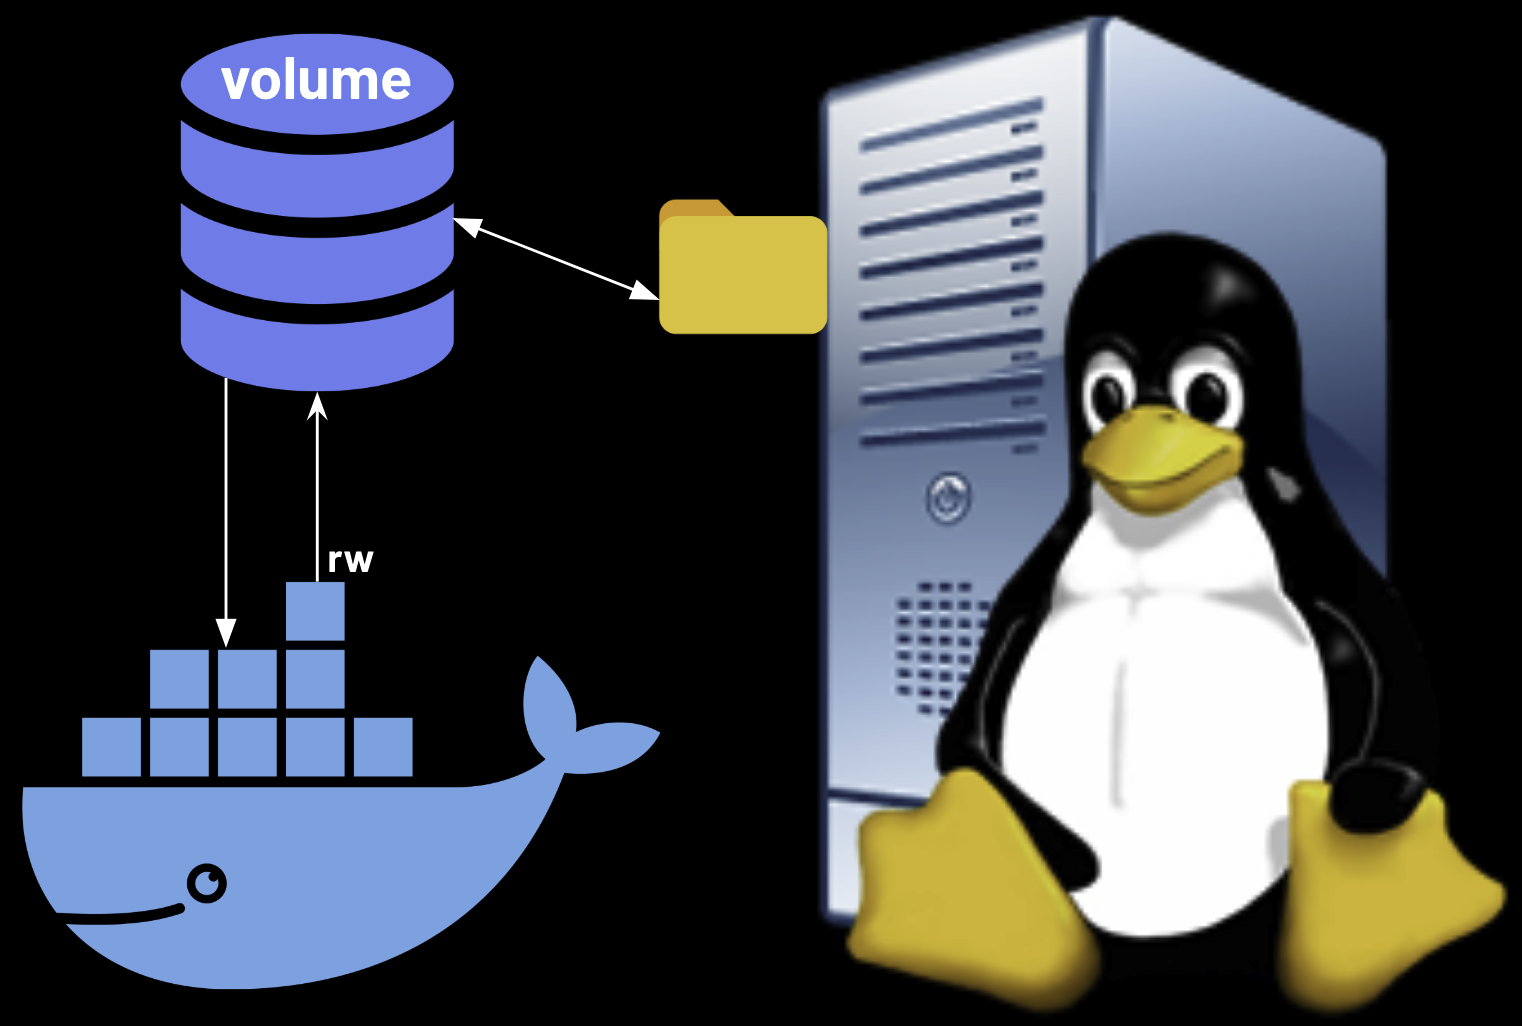 Below are some example use cases:
# Create a named volume (stored in /var/lib/docker/volumes/mysql_data on the host)
docker volume create mysql_data

# Run a MySQL container, mounting the volume to store data persistently (default is rw for read-write)
docker run -d --name mysql1 -v mysql_data:/var/lib/mysql mysql

# Run a container with a read-only volume mount, preventing modifications to the config files
docker run -d --name myapp -v /tmp/config:/app/config:ro myapp

# Use --volumes-from to mount the volume from mysql1 into mysql2, sharing data between the containers
docker run -d --volumes-from mysql1 --name mysql2 mysql
Installing Software in Docker
Search Image Versions
SHOW CONTENTS
vim ~/.bashrc:
# Search docker image versions
dkr_image_versions() {
# Usage: dkr_image_versions <image_name> [limit]
# Fetches version tags from Docker Hub for a given image, sorted by version number
# Default shows all versions, optional limit controls output count

local image_name=$1
local limit=${2:-0}  # Default 0 (show all), if not provided

# Validate input
if [ -z "$image_name" ]; then
   echo "Error: Image name not specified" >&2
   echo "Usage: dkr_image_versions <image_name> [limit]" >&2
   return 1
fi

# Fetch and process versions
versions=$(curl -s "https://hub.docker.com/v2/repositories/library/$   {image_name}/tags/?page_size=100" | \
   jq -r '.results[].name' | \
   grep -E '^[0-9]+\.*' | \
   sort -rV)  # Reverse version sort (newest first)

# Handle empty results
if [ -z "$versions" ]; then
   echo "No version tags found for image: ${image_name}" >&2
   return 1
fi

# Apply limit if specified
if [ "$limit" -gt 0 ]; then
   echo "$versions" | head -n "$limit"
else
   echo "$versions"
fi
}
source ~/.bashrcdkr_image_versions ubuntu [number]
Tomcat
SHOW CONTENTS

docker run -p 8080:8080 --name tomcat2 -it tomcat:9-jre17 /bin/bashrm -r webappsmv webapps.dist webapps./bin/catalina.sh run &sudo firewall-cmd --permanent --add-port=8080/tcpsudo firewall-cmd --reload
MySQL
SHOW CONTENTS
docker volume create mysql_data      # Volume for MySQL data
docker volume create mysql_log       # Volume for MySQL logs
docker volume create mysql_conf      # Volume for MySQL configuration
docker run -d \
  --name mysql \
  -e MYSQL_ROOT_PASSWORD=my-secret-pw \
  -p 3306:3306 \
  -v mysql_data:/var/lib/mysql \
  -v mysql_log:/var/log/mysql \
  -v mysql_conf:/etc/mysql/conf.d \
  mysql:latest
# Optional: Copy custom config file to the volume
cp my.cnf /var/lib/docker/volumes/mysql_conf/
docker exec -it mysql mysql -u root -p
Redis
SHOW CONTENTS
docker volume create redis_conf
docker volume create redis_data
/var/lib/docker/volumes/redis_conf/redis.conf:
# /app/redis/redis.conf
requirepass yourpassword
# bind 127.0.0.1        ← comment this out
daemonize no            # ensure Redis runs in foreground
docker run -d \
--name redis7 \
--privileged=true \
-p 6379:6379 \
-v redis_conf:/etc/redis \
-v redis_data:/data \
redis:7.4.3 redis-server /etc/redis/redis.conf